Introduction
Exploring festive flavors during the holiday season is a tradition that brings joy to many. As families and friends gather to celebrate, the aroma of freshly baked cookies fills the air, creating a warm and inviting atmosphere. Among the array of seasonal treats, Peppermint Spiral Joy cookies stand out with their vibrant colors and delightful peppermint flavor. These visually stunning cookies are not only a feast for the eyes but also a delightful treat that encapsulates the essence of the holidays.
The process of making Peppermint Spiral Joy cookies is a delightful journey that combines simple ingredients with creative techniques. With each step, you will learn how to create cookies that are not just delicious but also a spectacular centerpiece for any holiday gathering. Whether you’re an experienced baker or a novice in the kitchen, this article will guide you through the detailed process of making these beautiful cookies, ensuring that your holiday festivities are filled with sweetness and cheer.
In this article, we will explore the origins of peppermint in holiday baking, break down the necessary ingredients, and provide a step-by-step guide to preparing your Peppermint Spiral Joy cookies. Let’s dive into the festive spirit and get ready to impress your loved ones with this delightful treat!
The Origins of Peppermint in Holiday Baking
Understanding the role of peppermint in holiday baking is essential to appreciating the flavors that define this season. Peppermint has a rich history tied to various cultural traditions and has become synonymous with festive treats around the world.
Historical Significance of Peppermint During the Holidays
Peppermint, a hybrid of water mint and spearmint, has been cherished for centuries not only for its flavor but also for its medicinal properties. It was traditionally used to ease digestion and freshen breath. As time went on, peppermint became a popular flavoring agent in sweets and confections, particularly during the holiday season. The candy cane, with its iconic red and white stripes, emerged in Europe during the 17th century, symbolizing purity and sweetness. Today, it remains a staple in holiday celebrations.
Peppermint Flavors in Festive Treats
Over the years, peppermint flavors have found their way into a variety of holiday confections, from peppermint bark to hot chocolate. The invigorating taste of peppermint adds a refreshing twist to baked goods, making it a beloved ingredient in holiday cookies and desserts. Its unique flavor profile pairs beautifully with chocolate, vanilla, and other seasonal spices, enhancing the overall taste experience.
The Appeal of Visually Stunning Cookies in Holiday Traditions
In addition to their delightful flavors, visually stunning cookies have become a hallmark of holiday traditions. The vibrant colors and intricate designs of cookies like Peppermint Spiral Joy not only appeal to our taste buds but also to our sense of sight. These festive cookies make for perfect gifts, centerpieces, or simply a sweet treat to enjoy with family and friends. The act of decorating and presenting these cookies adds an element of creativity and joy to the holiday baking experience, making it a cherished activity for many families.
Ingredients Breakdown
Before we dive into the preparation, let’s take a closer look at the ingredients that will make your Peppermint Spiral Joy cookies a success. Each ingredient plays a crucial role in achieving the perfect texture and flavor.
All-Purpose Flour
All-purpose flour is the foundation of the cookie dough, providing structure and stability. It is essential for creating the right texture in your cookies. For those looking for gluten-free alternatives, consider using a gluten-free flour blend that includes xanthan gum to help bind the ingredients together.
Baking Powder and Salt
Baking powder and salt are important for achieving the right texture in your cookies. Baking powder acts as a leavening agent, helping the cookies rise and become light and fluffy. A pinch of salt enhances the overall flavor, balancing the sweetness of the sugar and the richness of the butter.
Butter and Powdered Sugar
Butter and powdered sugar create a creamy, sweet base for the cookie dough. Using unsalted butter allows you to control the amount of salt in the recipe. Ensure that your butter is at room temperature for easy mixing. Powdered sugar, also known as confectioners’ sugar, adds sweetness and helps create a smooth texture in the dough.
Egg and Peppermint Extract
The egg serves as a binding agent, helping to hold the dough together and adding moisture. Peppermint extract is the star of the show, infusing the cookies with that signature minty flavor. Opt for pure peppermint extract for the best flavor, but if you can only find imitation extract, it will still work.
Crushed Peppermint Candies
Crushed peppermint candies not only add texture to the cookies but also contribute to their festive appearance. You can use candy canes or peppermint disks for this purpose. Make sure to crush them into small pieces to ensure even distribution throughout the dough.
Food Coloring
To transform your dough into a festive masterpiece, food coloring is essential. Use gel or liquid food coloring to achieve vibrant red and green hues that will make your cookies visually appealing. Always start with a small amount and gradually add more until you reach your desired color.
Optional Chocolate Drizzle
For an extra touch of indulgence, consider adding a chocolate drizzle to your Peppermint Spiral Joy cookies. Melted chocolate not only enhances the flavor but also gives the cookies a sophisticated look. You can use dark, milk, or white chocolate, depending on your preference.
Preparation Steps for Peppermint Spiral Joy Cookies
Now that we have a clear understanding of the ingredients, let’s move on to the preparation steps. This section will provide a detailed guide on how to create your Peppermint Spiral Joy cookies, ensuring clarity and ease for every reader.
Gathering Your Supplies
Before you begin, it’s essential to gather all your supplies and organize your workspace. A well-prepared kitchen will make the baking process smoother and more enjoyable.
Essential Kitchen Tools and Equipment Needed for the Recipe
– Mixing bowls: For combining your ingredients.
– Measuring cups and spoons: To ensure accurate measurements.
– Rubber spatula: For mixing and scraping down the sides of the bowl.
– Rolling pin: For rolling out the dough.
– Plastic wrap: To cover the dough while it chills.
– Baking sheets: For placing the cookies in the oven.
– Parchment paper: To line your baking sheets for easy clean-up.
– Cooling rack: To allow your cookies to cool completely.
Tips for Organizing Your Workspace
1. Clean Your Countertops: Start with a clean surface to work on, as this helps prevent cross-contamination and keeps your ingredients in order.
2. Measure Ingredients Ahead of Time: Pre-measure all your ingredients and have them ready to go. This will streamline the mixing process and help you avoid forgetting any components.
3. Set Up Your Baking Area: Arrange your tools and equipment in an efficient manner, placing the items you will use most frequently within easy reach. This will minimize distractions and keep you focused on the task at hand.
Making the Dough
Now that you have everything set up, it’s time to start making the dough for your Peppermint Spiral Joy cookies. Follow these detailed steps to create a delicious and visually appealing cookie dough.
1. Cream the Butter and Sugar: In a large mixing bowl, use an electric mixer to cream together the softened butter and powdered sugar until the mixture is light and fluffy. This process usually takes about 2-3 minutes. Make sure to scrape down the sides of the bowl to ensure everything is well combined.
2. Add the Egg and Peppermint Extract: Once the butter and sugar are well blended, add the egg and peppermint extract to the mixture. Beat until fully incorporated. The egg will add moisture to the dough, while the peppermint extract will infuse it with flavor.
3. Combine the Dry Ingredients: In a separate bowl, whisk together the all-purpose flour, baking powder, and salt. Gradually add this dry mixture to the wet ingredients, mixing on low speed until just combined. Be careful not to overmix, as this can lead to tough cookies.
4. Divide the Dough: Once your dough is well combined, divide it into two equal portions. Place one portion in a separate bowl and set it aside. This will be the base dough, while the other portion will be colored and flavored for the spiral design.
5. Color the Second Portion: To the second portion of dough, add a few drops of red food coloring. Use your hands or a spatula to knead the dough until the color is evenly distributed. If necessary, add more food coloring to achieve your desired shade of red. Repeat this process with green food coloring for the first portion of dough if you wish to have a two-color spiral.
6. Chill the Dough: Wrap each portion of dough in plastic wrap and refrigerate for at least 30 minutes. Chilling the dough helps it firm up, making it easier to roll out and shape.
With these initial steps complete, you’re well on your way to creating beautiful Peppermint Spiral Joy cookies. Stay tuned for the next section, where we’ll guide you through rolling, shaping, and baking these delightful treats!
Detailed Instructions on Preparing the Dough
To create the perfect Peppermint Spiral Joy cookies, the first crucial step is preparing the dough. This dough serves as the foundation of your cookies, so attention to detail is paramount. Begin by creaming together the softened butter and sugar in a mixing bowl. Use an electric mixer on medium speed until the mixture is light and fluffy, which usually takes about 3–5 minutes. This aeration process is essential as it helps to incorporate air into the dough, leading to a lighter texture.
Next, add in the egg and peppermint extract. The egg not only binds the ingredients together but also contributes to the cookies’ final texture. Mix until fully combined, taking care not to overmix at this stage to prevent the dough from becoming tough. In a separate bowl, whisk together the flour, baking powder, and salt. Gradually incorporate this dry mixture into the wet ingredients, mixing until just combined to ensure a tender cookie.
Coloring the Dough
Once your dough is ready, it’s time to bring some color to your cookies. Divide the dough into two equal portions. To achieve vibrant red and green shades for your Peppermint Spiral Joy cookies, you’ll need to use gel food coloring. Gel colors are recommended because they provide a rich hue without altering the dough’s consistency.
Start with the green dough. Add a few drops of green gel food coloring to one half of the dough. Use a spatula or your hands to knead the color into the dough until it’s evenly distributed. To achieve the desired shade, you can add more color gradually until you’re satisfied with the brightness. Repeat the same process with the red gel food coloring for the other half of the dough. Remember, the key to vibrant colors lies in thorough mixing, ensuring no streaks remain.
Layering and Rolling the Dough
Now that you have your beautifully colored doughs, it’s time to layer and roll them into spirals. Begin by placing the green dough on a sheet of parchment paper. Use a rolling pin to flatten it into a rectangle, about 1/4 inch thick. Make sure the edges are as straight as possible for a neater appearance.
Next, repeat the process with the red dough, rolling it out to the same dimensions as the green layer. Carefully lay the red rectangle on top of the green dough. Gently press the two layers together to adhere them without squishing them too much.
The real magic happens during the rolling process. Starting from one end of the rectangle, tightly roll the two layers together into a log, ensuring that the colors remain aligned. As you roll, try to keep the log as tight as possible to maintain a uniform spiral shape. Once you’ve reached the end, pinch the seam to seal it, then wrap the log in plastic wrap. This will help maintain its shape while chilling.
Chilling the Dough
Chilling the dough is a vital step that should not be skipped. It allows the butter to firm up, which helps keep the cookies from spreading too much during baking. Place the wrapped dough log in the refrigerator for at least 1 hour, or up to overnight. If you’re short on time, a minimum of 30 minutes can work, but the longer the chill, the better the results.
During this chilling period, the dough will become firmer and easier to slice. If you notice the dough is too soft after chilling, you can put it in the freezer for an additional 10–15 minutes for a quicker firming effect.
Baking the Cookies
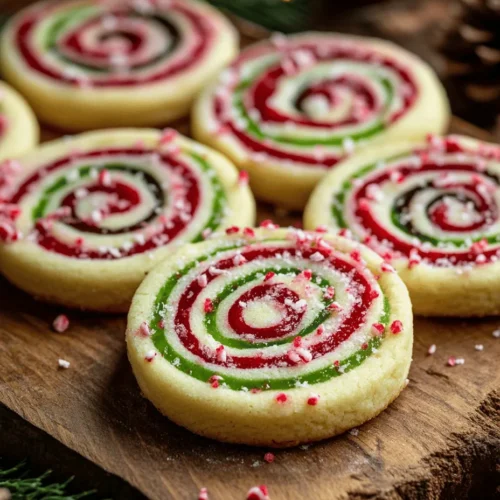
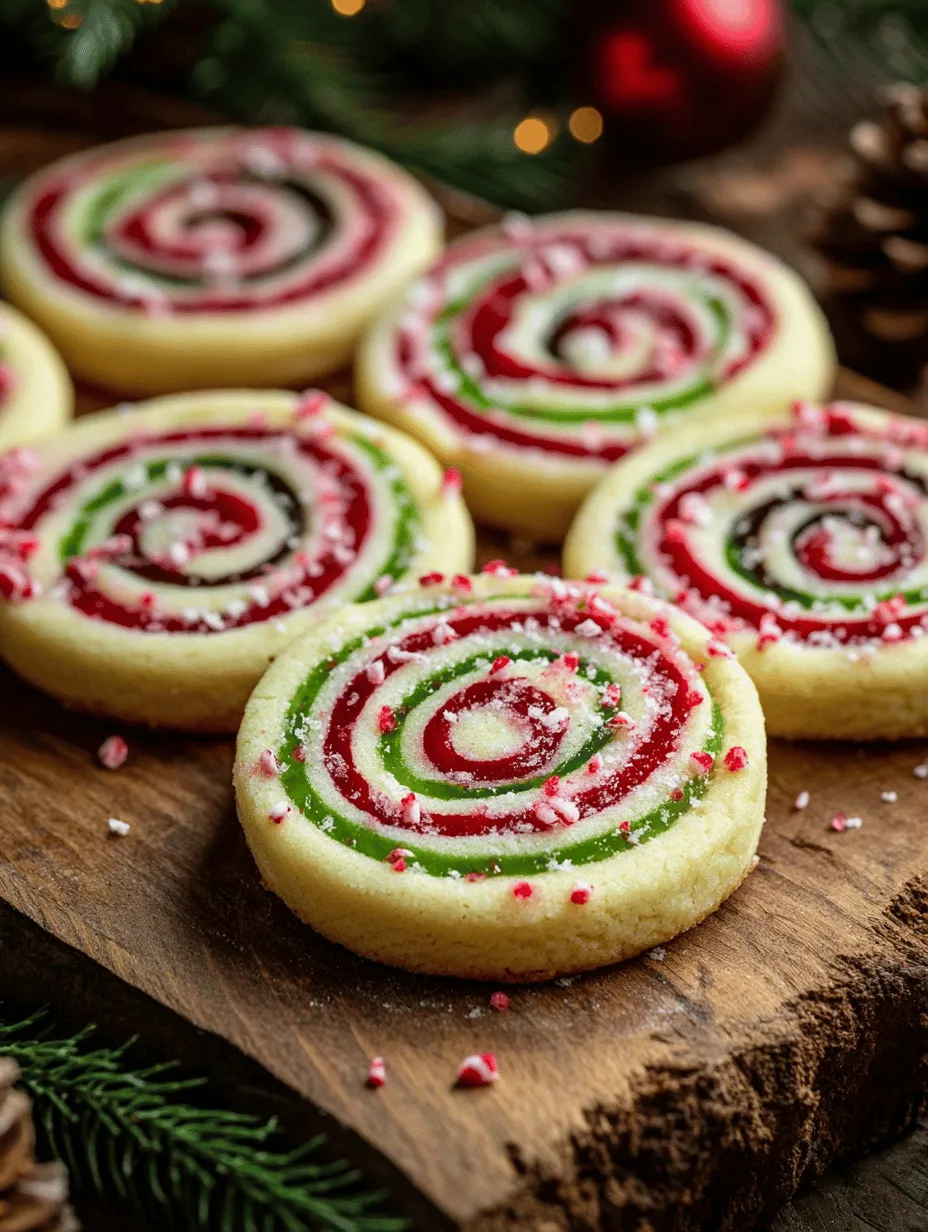
Preheating your oven is an essential step that ensures even baking. Set your oven to 350°F (175°C) and allow it to preheat fully while you prepare to slice your chilled dough. Once preheated, take the dough log out of the refrigerator and unwrap it. Using a sharp knife, slice the log into 1/4 inch thick rounds. Ensure each slice reveals the beautiful spiral pattern of red and green.
Place the cookie slices on a baking sheet lined with parchment paper, leaving space between each slice to allow for spreading. Bake the cookies in your preheated oven for about 10-12 minutes. Keep an eye on them as baking times can vary based on your oven. The cookies should look set around the edges and slightly soft in the center when done. Allow them to cool on the baking sheet for a few minutes before transferring them to a wire rack to cool completely.
The Art of Chocolate Drizzling
Once your cookies are cool, it’s time to add the finishing touch: the chocolate drizzle. Start by melting your choice of chocolate—dark, milk, or white—using a double boiler or in the microwave in short bursts (about 15-20 seconds at a time) until smooth. If using the microwave, stir the chocolate in between intervals to prevent burning.
To create an appealing drizzle, transfer the melted chocolate to a piping bag or a small zip-top bag with a corner snipped off. Drizzle the chocolate over the cooled cookies in a zig-zag pattern for an elegant touch. Alternatively, you can dip the edge of each cookie into the chocolate for a bolder chocolate flavor. Allow the chocolate to set at room temperature or in the refrigerator for a quicker firming process.
Serving Suggestions and Pairings
These Peppermint Spiral Joy cookies are not only festive but also versatile in how they can be served and enjoyed. For the best experience, serve them at room temperature, allowing the flavors to shine. Presentation can elevate your cookie display: arrange them on a beautiful platter or tiered stand, and garnish with some crushed peppermint candies for an extra festive touch.
When it comes to beverage pairings, consider serving these cookies alongside a hot cup of cocoa or peppermint tea. The warm beverages complement the minty flavors and create a cozy atmosphere. For a more adult twist, a glass of spiced rum or peppermint schnapps can enhance the peppermint’s deliciousness.
If you’re looking to gift these delightful cookies, thoughtful packaging can make all the difference. Consider placing them in a decorative tin or a clear cellophane bag tied with a festive ribbon. Adding a personalized note or tag can make the gesture even more special, ideal for holiday gatherings or as a charming gift for friends and family.
Conclusion
Peppermint Spiral Joy cookies encapsulate the essence of the holiday season, merging creativity with flavors that evoke warmth and joy. By meticulously following this guide, you can master the art of crafting these delightful cookies that will surely impress your guests and elevate any celebration. With their vibrant colors and delightful peppermint flavor, these cookies are destined to become a staple in your holiday traditions.
Whether shared during a festive gathering, enjoyed with loved ones, or gifted to friends, these cookies embody more than just a treat—they are a celebration of the season. Dive into the joy of baking and let your culinary creativity shine with these Peppermint Spiral Joy cookies, ensuring your holidays are filled with love, laughter, and deliciousness.