Introduction: The Joy of Italian Grinder Sandwiches
The Italian Grinder Sandwich is not just a meal; it’s an experience that transports you straight to the sun-kissed streets of Italy. With its layers of savory meats, creamy cheese, and vibrant vegetables, this sandwich embodies the essence of Italian cuisine. Each bite is a delightful explosion of flavors and textures, from the crunch of fresh vegetables to the satisfying chew of perfectly toasted bread. In this article, we will explore the rich history of the Italian Grinder, break down the ingredients that make it special, and provide you with a detailed recipe to create this delicious sandwich at home. Whether you are hosting a gathering or simply craving a hearty lunch, this recipe will become a staple in your culinary repertoire.
Understanding the Italian Grinder Sandwich
The Origins of the Italian Grinder
The Italian Grinder Sandwich, often referred to as a hoagie or sub in various regions of the United States, has a rich history that dates back to the early 20th century. Its roots can be traced to Italian immigrants who settled in America and brought with them their culinary traditions. As these immigrants adapted their recipes to local ingredients and tastes, the Italian Grinder emerged as a quintessential representation of Italian-American cuisine.
Originally, the sandwich was a simple affair, consisting primarily of cured meats and a few vegetables, layered generously on a loaf of Italian bread. Over the years, it evolved to include a wide variety of meats—such as salami, mortadella, and capicola—as well as an array of toppings and dressings. This evolution reflects the cultural melting pot that is America, where diverse culinary influences come together to create something uniquely delicious.
The Italian Grinder is more than just a sandwich; it represents community and tradition. Often served at family gatherings and celebrations, it has become a beloved staple in delis and sandwich shops across the country. The sandwich is celebrated for its adaptability, allowing for personal touches and variations that cater to individual tastes while still honoring its Italian roots.
Key Ingredients That Make the Sandwich Shine
The Italian Grinder Sandwich is all about its ingredients. Each component plays a crucial role in crafting the perfect balance of flavors and textures that make this sandwich so irresistible. Understanding these ingredients will not only enhance your appreciation of the sandwich but also ensure that you create the best version possible at home.
Overview of Essential Ingredients
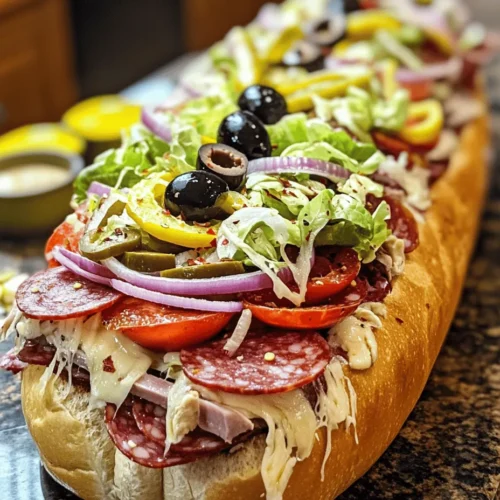
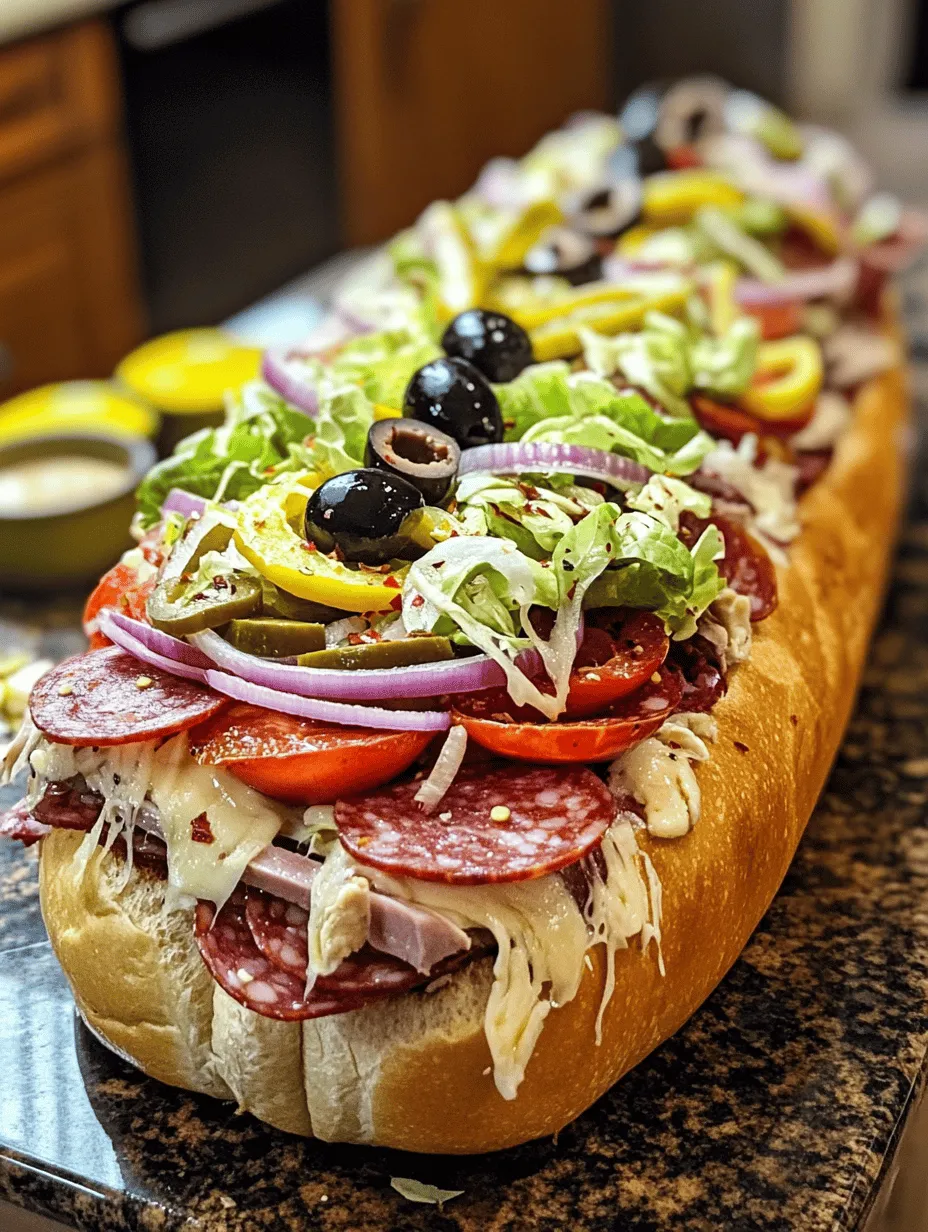
1. Meats: The heart of the Italian Grinder is, without a doubt, the selection of meats. Traditional choices include salami, capicola (also known as coppa), and mortadella. These cured meats are rich in flavor and provide a savory backbone to the sandwich.
2. Cheese: Provolone cheese is a classic choice for Italian Grinders. Its mild flavor and creamy texture make it an ideal complement to the robust meats. However, there are numerous cheese alternatives available, each bringing its unique character to the sandwich.
3. Vegetables: Fresh vegetables add crunch and brightness to the sandwich. Lettuce, tomatoes, banana peppers, and onions are common choices that not only enhance the flavor but also contribute to the overall aesthetic appeal of the sandwich.
4. Dressing: The right dressing can elevate the Italian Grinder from good to extraordinary. A simple combination of olive oil, vinegar, and Italian seasoning can provide the perfect finishing touch, tying all the flavors together.
Using fresh, high-quality ingredients is essential for achieving the best flavor. The quality of the meats, cheese, and vegetables will ultimately determine the success of your sandwich, making it worthwhile to source the best options available.
Gathering Your Ingredients
Now that you understand the significance of each ingredient, it’s time to gather everything you need to create your Italian Grinder Sandwich. Let’s break down each component to ensure you have the best ingredients on hand.
The Bread: A Foundation for Flavor
The foundation of any great sandwich is, of course, the bread. For an Italian Grinder, the type of bread you choose can significantly impact the overall flavor and texture. A traditional sub roll or hoagie bread is ideal, as it is soft yet sturdy enough to hold the generous fillings without falling apart.
When selecting your bread, look for options that are freshly baked and have a crispy outer crust and a soft interior. If you’re feeling adventurous, consider trying different types of bread, such as ciabatta or focaccia, which can add a unique twist to the classic sandwich flavor profile.
If you prefer a lighter option, you might also consider whole grain or seed-topped rolls, which can provide a nutty flavor and extra nutrition. Just ensure the bread is substantial enough to support the weight of the fillings without becoming soggy.
Meats: The Heart of the Italian Grinder
The meat selection is arguably the most crucial aspect of the Italian Grinder. The traditional trio of salami, mortadella, and capicola is beloved for a reason. Each meat brings its unique flavor and texture, creating a harmonious balance that is satisfying and delicious.
– Salami: This cured sausage is seasoned with a variety of spices, giving it a rich, savory flavor. Its firm texture offers a satisfying bite that contrasts beautifully with the softer elements of the sandwich.
– Mortadella: Often compared to bologna, mortadella is a flavorful Italian sausage that is studded with small pieces of pork fat, giving it a rich and creamy mouthfeel. Its subtle spices and smooth texture make it an excellent choice for layering.
– Capicola: This dry-cured meat, made from pork shoulder or neck, is known for its robust flavor and slightly spicy kick. It adds a depth of flavor that ties the sandwich together.
When sourcing your deli meats, prioritize high-quality options. Visit local butchers or specialty Italian markets, where you can often find freshly sliced, artisanal meats that will elevate your sandwich. Additionally, consider asking for thinner slices, as they will layer more easily and distribute flavor more evenly throughout the sandwich.
Cheese: Adding Creaminess and Flavor
No Italian Grinder is complete without cheese, and provolone is the star of the show. This cheese is made from cow’s milk and has a mild yet distinctive flavor that pairs perfectly with the robust meats. Its creamy texture melts beautifully, making it a favorite among sandwich enthusiasts.
If you’re looking to experiment with different flavors, consider alternative cheese options such as:
– Mozzarella: Fresh mozzarella provides a milky, delicate flavor and a delightful stretch when melted.
– Fontina: This semi-soft cheese has a nutty flavor and melts wonderfully, adding a rich creaminess to the sandwich.
– Pepper Jack: If you enjoy a bit of spice, pepper jack cheese can add a kick to your sandwich with its jalapeño bits.
When selecting cheese, aim for fresh, high-quality options. If possible, opt for artisan cheeses from local producers, as they often have superior flavor and texture compared to mass-produced varieties.
Fresh Vegetables: Elevating the Sandwich
The final touch to your Italian Grinder comes from the fresh vegetables. Using high-quality, fresh produce is essential for adding crunch, color, and flavor to your sandwich. Here are some classic vegetable choices to consider:
– Lettuce: Crisp romaine or iceberg lettuce provides a refreshing crunch and balances the richness of the meats and cheese.
– Tomatoes: Juicy, ripe tomatoes add a burst of freshness and acidity that cuts through the heaviness of the other ingredients.
– Banana Peppers: These tangy, mildly spicy peppers are a traditional addition that brings a delightful kick to the sandwich. They can be used pickled or fresh, depending on your preference.
– Onions: Sliced red onions or sweet onions can add a sharp flavor that enhances the overall taste profile of the sandwich.
To ensure maximum freshness, store your vegetables properly. Keep lettuce and tomatoes in the refrigerator and wash them just before using to prevent wilting. If you’re using banana peppers, consider pickling them in advance for added flavor.
With your ingredients gathered, you’re well on your way to crafting the perfect Italian Grinder Sandwich. In the next section, we will dive into the detailed instructions on how to assemble and create this mouthwatering dish that is sure to impress family and friends alike.
Dressings and Seasonings: The Final Touch
No Italian Grinder Sandwich would be complete without the perfect dressing to tie together its myriad flavors. Italian dressing plays a pivotal role in enhancing the overall taste of the sandwich. This zesty concoction not only adds moisture but also infuses a delightful tang that complements the savory meats and crisp vegetables.
For those looking to elevate their experience, homemade Italian dressing can be a game-changer. While store-bought versions offer convenience, crafting your dressing allows for customization in flavors and freshness. A simple recipe consists of olive oil, red wine vinegar, minced garlic, Italian herbs (like oregano and basil), salt, and pepper. Whisk these ingredients together, and you have a dressing that is vibrant and full of personality. Compared to store-bought options, homemade dressing typically contains fewer preservatives and allows for a fresher taste.
Step-by-Step Guide to Making the Italian Grinder Sandwich
Preparing the Bread: The Perfect Slice
The foundation of any great sandwich starts with the bread. For an Italian Grinder, a fresh sub roll or hoagie is essential. To prepare the bread correctly:
1. Choose Quality Bread: Select a soft yet sturdy sub roll that can hold the fillings without falling apart.
2. Slice with Care: Using a serrated knife, slice the sub roll lengthwise without cutting all the way through. Aim to create a hinge that keeps the sandwich intact while allowing for ample filling space.
This careful cutting technique ensures that your sandwich will be able to accommodate the rich fillings without compromising its structural integrity.
Layering the Meats: Crafting the Perfect Base
The next step involves layering the meats, which are the heart of the Italian Grinder. Here’s how to do it effectively:
1. Select Your Meats: Common choices include salami, ham, mortadella, and capicola. Feel free to mix and match based on your preferences.
2. Even Distribution: Begin with a base layer of your favorite meat. Fold or layer the slices instead of piling them in one spot. This method allows for an even distribution of flavors throughout the sandwich, ensuring that every bite is as delicious as the last.
By carefully layering the meats, you’ll create a satisfying and flavorful foundation for your Italian Grinder.
Adding Cheese: Creating a Creamy Texture
Cheese is a crucial element that adds creaminess and richness to your sandwich. Here are the best practices for layering cheese:
1. Choose the Right Cheese: Provolone or mozzarella are excellent choices for an Italian Grinder due to their melting qualities and mild flavors.
2. Layer Generously: Place a few slices of cheese over the meat layer, ensuring that it covers the meat completely. This not only adds flavor but also helps bind the ingredients together, especially if you choose to toast the sandwich later.
The cheese will melt perfectly, creating a delightful gooey texture that enhances the overall experience.
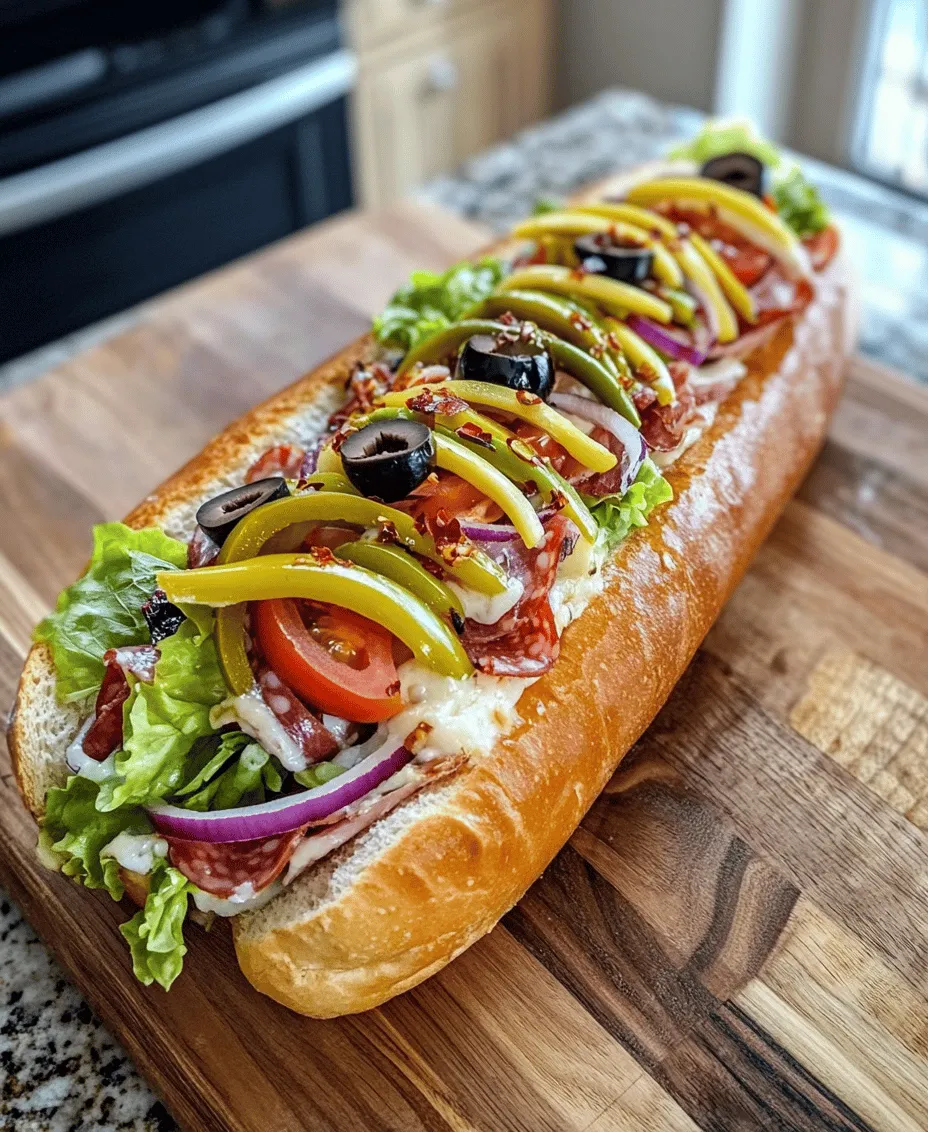
Loading Up with Vegetables: Balancing Flavor and Texture
Vegetables are essential for adding a fresh crunch and brightness to your Italian Grinder. Here’s how to layer them effectively:
1. Select Fresh Veggies: Common choices include lettuce, tomatoes, red onions, and peppers. You might also consider adding spicy banana peppers or pepperoncini for an extra kick.
2. Layering Technique: Start with a layer of shredded lettuce for a crispy base, followed by thinly sliced tomatoes and onions. For peppers, distribute them evenly to ensure every bite has a hint of crunch and tang.
This careful layering not only provides a satisfying texture contrast with the meats and cheese but also enhances the sandwich’s overall flavor profile.
Drizzling the Dressing: Ensuring Flavor in Every Bite
The dressing is where the magic happens, bringing all the components of the sandwich together. Here’s how to apply it:
1. Amount Matters: Drizzle a moderate amount of homemade or store-bought Italian dressing over the vegetable layer. Too much dressing can make the sandwich soggy, while too little might leave it dry.
2. Even Distribution: Use a spoon or a small bottle to evenly distribute the dressing. This ensures that every bite is infused with the zesty flavors of the dressing, enhancing the overall taste experience.
Properly drizzling the dressing will elevate the sandwich from good to unforgettable.
Closing and Pressing: Compaction Techniques
Once your sandwich is assembled, it’s essential to compact it slightly. This step not only helps meld the flavors but also makes it easier to slice and serve.
1. Pressing Technique: Gently press down on the top of the sandwich using your palms. Alternatively, you can wrap it in parchment paper and apply a weight, such as a plate or a heavy skillet, for a few minutes. This compaction helps the layers stick together while enhancing the flavor synergy between the ingredients.
It’s a simple step, but it can significantly improve the final texture of your Italian Grinder.
Optional Toasting: For Those Who Prefer Warmth
If you’re a fan of warm, crispy sandwiches, toasting is a must-try option. Here’s how to achieve the perfect toast:
1. Preheat Your Oven: Set your oven to 350°F (175°C) or use a panini press if available.
2. Toast the Sandwich: Wrap the sandwich in aluminum foil and place it in the oven for about 10-15 minutes. If using a panini press, toast it until the bread is golden brown and the cheese is melted.
Toasting not only gives the sandwich a crunchy exterior but also enhances the flavors of the melted cheese and warm meats, resulting in a comforting and satisfying meal.
Slicing and Serving: Presentation Matters
Presentation is key when serving your Italian Grinder Sandwich, as it enhances the dining experience.
1. Slicing Technique: Use a sharp knife to cut the sandwich diagonally into halves or quarters. This not only makes it easier to handle but also showcases the beautiful layers of ingredients.
2. Serving Suggestions: Plate the sandwich alongside sides like potato chips, a light salad, or pickles for added crunch. You might also consider serving it with extra dressing on the side for dipping.
A well-presented sandwich not only looks appealing but also invites everyone to dig in and enjoy.
Conclusion: Enjoying Your Italian Grinder Sandwich
The Italian Grinder Sandwich is more than just a meal; it’s a celebration of flavors, textures, and culinary tradition. By following this detailed guide, you can recreate this beloved sandwich in your own kitchen, allowing you to enjoy a taste of Italy anytime you desire. As you savor each bite, you will appreciate not only the delicious ingredients but also the love and history behind this classic dish.
Whether you share it with friends or relish it alone, the Italian Grinder is more than just food; it’s a way to connect with heritage and indulge in comfort. So gather your ingredients, follow this guide, and experience the joy of crafting your own Italian Grinder Sandwich. Buon appetito!