Introduction
In the world of desserts, few things can rival the allure of a cheesecake. The creamy texture, rich flavor, and endless customization options make it a favorite among dessert lovers everywhere. Among the many variations, the no-bake cheesecake trend has taken the culinary world by storm. This delightful twist on a classic dessert not only simplifies the preparation process but also results in a light and airy texture that’s simply irresistible.
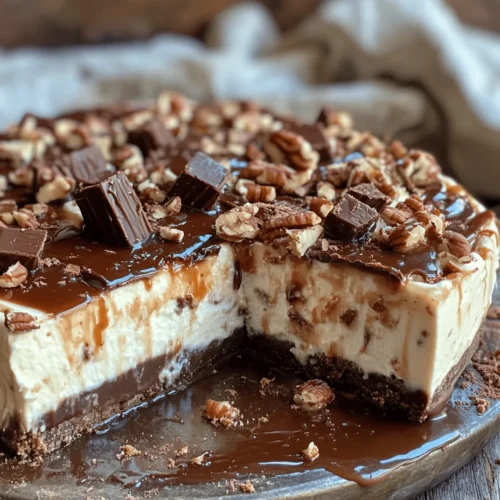
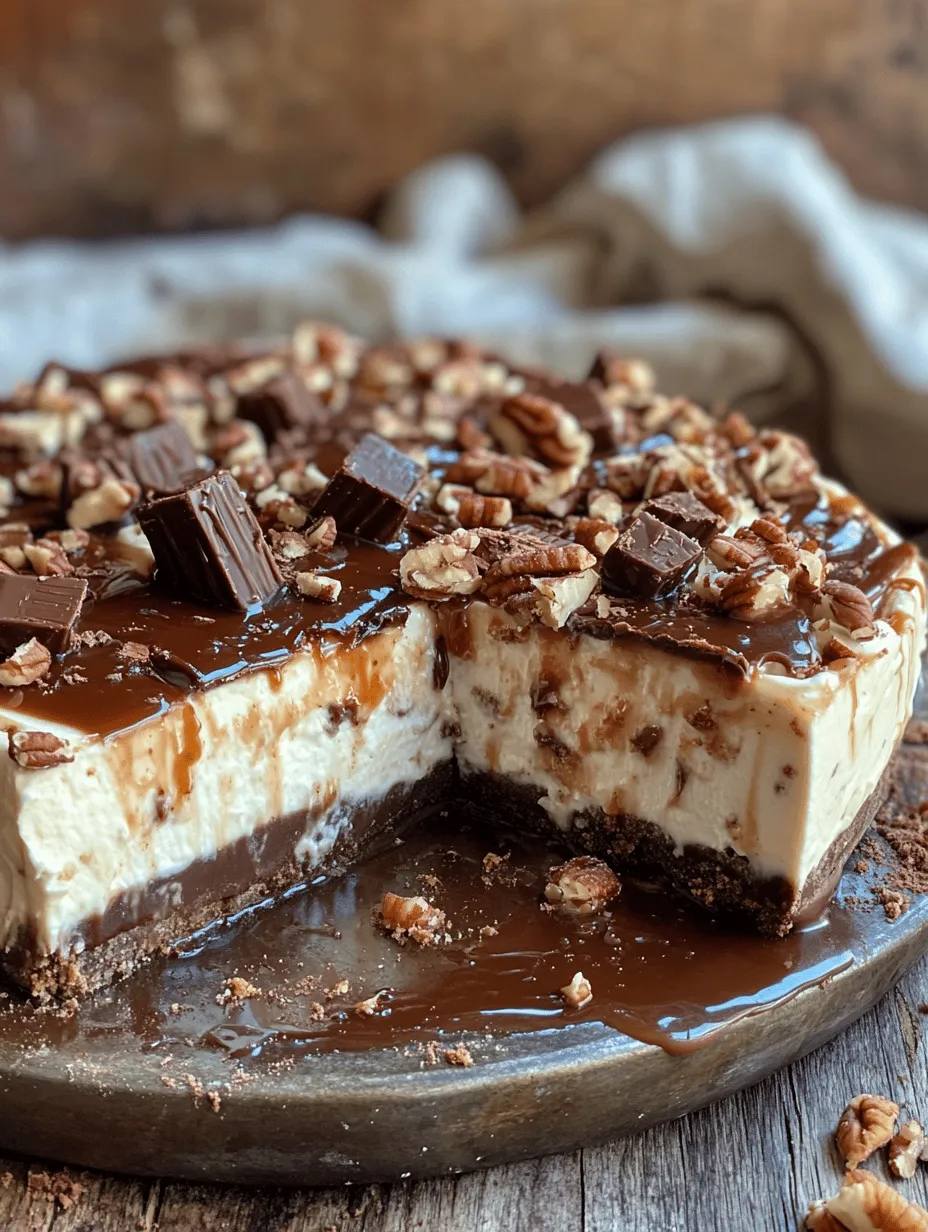
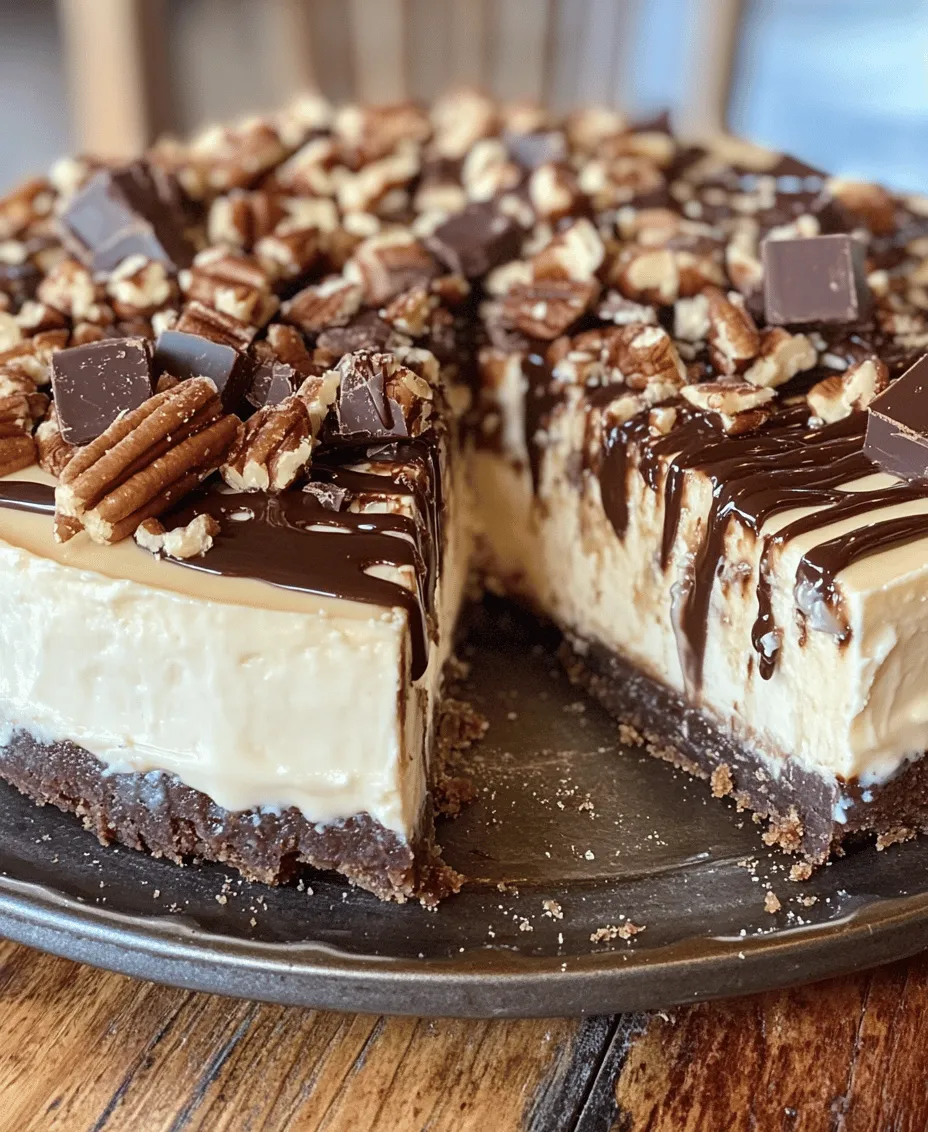
Today, we’re diving into a particularly indulgent variation: the Decadent Homemade No-Bake Twix Cheesecake. This dessert is a glorious fusion of flavors and textures, combining the smoothness of cheesecake with the crunchy caramel goodness of Twix bars. Imagine a creamy cheesecake filling layered over a buttery shortbread crust, topped with layers of caramel and chocolate. It’s a dessert that’s sure to impress at any gathering, from casual family dinners to sophisticated holiday parties.
One of the most appealing aspects of this no-bake cheesecake is its ease of preparation. With minimal cooking involved, you can spend less time in the kitchen and more time enjoying the sweet rewards of your efforts. Plus, the absence of baking means you can achieve that perfect, creamy texture without the worry of overcooking or cracking—a common pitfall with traditional baked cheesecakes.
In this article, we will provide a detailed guide for making your very own Twix cheesecake. From understanding the key components of this delectable treat to crafting the perfect crust and filling, we will walk you through each step, ensuring that you can recreate this dessert in your own kitchen with ease and confidence.
Understanding the Components of Twix Cheesecake
To truly appreciate the decadence of a Twix cheesecake, it’s essential to understand its key components: the crust, the filling, the Twix layer, and the chocolate drizzle. Each element plays a pivotal role in creating the overall flavor and texture that makes this dessert so irresistible.
The Crust
The foundation of any great cheesecake starts with the crust. For our Twix cheesecake, we will utilize shortbread cookies, which bring a buttery and slightly sweet flavor to the mix. The crumbly texture of the crushed cookies, combined with a touch of sugar and melted butter, creates a robust crust that holds its shape while providing a delightful contrast to the creamy filling.
The Filling
Next comes the cheesecake filling, which is the heart of the dessert. The filling is made from a blend of cream cheese, powdered sugar, vanilla extract, and heavy whipping cream. The cream cheese lends a rich and silky texture, while the whipped cream adds lightness, making every bite melt in your mouth. The powdered sugar sweetens the filling just enough to balance the flavors without overpowering the other ingredients.
The Twix Layer
What truly sets this cheesecake apart is the inclusion of Twix bars. Chopped pieces of Twix are folded into the filling, adding bursts of caramel and chocolate that elevate the cheesecake to another level of indulgence. This layer not only enhances the flavor but also adds a delightful chewiness to the creamy filling.
The Chocolate Drizzle
Finally, we finish off our masterpiece with a chocolate drizzle. A rich ganache made from chocolate and cream adds a glossy finish and an extra layer of chocolatey goodness. This drizzle serves as the perfect finishing touch, enhancing both the appearance and flavor of the cheesecake.
Creating the Perfect Crust
The crust is an essential component of any cheesecake, serving as the base for the rich filling and adding texture to each bite. For our no-bake Twix cheesecake, we will be creating a simple yet delicious crust using shortbread cookies, sugar, and melted butter.
Ingredients Breakdown
– Shortbread Cookies: The main ingredient, providing a buttery flavor and crumbly texture.
– Sugar: A small amount of granulated sugar enhances the sweetness of the crust.
– Butter: Melted butter acts as the binding agent, ensuring the crust holds together perfectly.
Step-by-Step Instructions for Preparing the Crust
1. Mixing the Ingredients: Begin by crushing the shortbread cookies into fine crumbs. You can use a food processor for a quick and even texture, or place the cookies in a zip-top bag and crush them with a rolling pin. In a mixing bowl, combine the cookie crumbs with the granulated sugar. Pour in the melted butter and stir until the mixture resembles wet sand.
2. Pressing the Mixture into the Pan: Take a 9-inch springform pan and firmly press the crust mixture into the bottom and slightly up the sides. Use the bottom of a measuring cup or your fingers to ensure it’s packed tightly and evenly.
3. Importance of Chilling Before Adding the Filling: Once the crust is pressed into place, it’s crucial to chill it in the refrigerator for at least 20-30 minutes. This step allows the butter to firm up, making the crust more stable and preventing it from crumbling when you add the filling.
Crafting the Cheesecake Filling
The filling is where the magic happens, transforming simple ingredients into a luscious, creamy delight. The role of the cream cheese filling is paramount as it contributes to the cheesecake’s overall texture, ensuring it remains smooth and decadent.
Detailed Ingredient List for the Filling
– Cream Cheese: The star ingredient that gives the cheesecake its rich and creamy base.
– Powdered Sugar: Adds sweetness without the graininess of granulated sugar.
– Vanilla Extract: A splash of vanilla enhances the flavor profile, bringing warmth and depth.
– Heavy Whipping Cream: Whipped to stiff peaks, it adds lightness and aeration to the filling.
Step-by-Step Instructions for Making the Filling
1. Beating Cream Cheese and Sugar Until Creamy: In a large mixing bowl, use an electric mixer to beat the cream cheese until it’s smooth and creamy. Gradually add the powdered sugar, continuing to mix until fully incorporated and there are no lumps.
2. Incorporating Vanilla Extract: Add the vanilla extract to the mixture, blending it in until evenly distributed. This step will enhance the overall flavor of your cheesecake.
3. Whipping Cream to Stiff Peaks and Folding It In: In a separate bowl, whip the heavy cream until stiff peaks form. This means that when you lift the whisk, the cream should hold its shape without drooping. Carefully fold the whipped cream into the cream cheese mixture in three parts, being gentle to maintain the airy texture.
Assembling the Cheesecake Layer by Layer
Once your crust is chilled and your filling is prepared, it’s time to assemble this beautiful dessert layer by layer. Layering is essential for achieving a balanced flavor and ensuring every bite is filled with the delightful combination of cheesecake, Twix, and chocolate.
Detailed Instructions on How to Layer the Cheesecake
1. Adding the Cream Cheese Filling: Start by spooning half of the cream cheese filling into the chilled crust. Use a spatula to spread it evenly across the crust, ensuring a smooth, level surface.
2. Incorporating the Twix Bars: Next, sprinkle a generous amount of chopped Twix bars over the first layer of filling. This adds texture and flavor that will permeate throughout the cheesecake.
3. Topping with the Remaining Filling: Carefully add the remaining filling on top of the Twix layer, smoothing it out gently to create an even layer. This will encase the Twix bars, allowing their flavors to meld with the cheesecake.
4. Chilling the Cheesecake: To set the cheesecake properly, cover it with plastic wrap and refrigerate for at least 4-6 hours, or ideally overnight. This chilling time allows the flavors to deepen and the filling to firm up perfectly.
With the cheesecake fully assembled, you’re well on your way to creating the ultimate dessert. In the next section, we will discuss how to finish it off with a rich chocolate drizzle and share some tips for serving this decadent treat. Stay tuned for the final touches that will make your Decadent Homemade No-Bake Twix Cheesecake truly unforgettable.
Spreading the Cheesecake Filling
Once your crust is ready and fully chilled, it’s time to focus on the cheesecake filling. Start by grabbing your prepared crust from the refrigerator. With a spatula or the back of a spoon, gently spread the cheesecake mixture over the crust, ensuring an even layer. Start from the center and work your way outwards to avoid disturbing the crust too much. It’s important to take your time during this step to achieve a smooth surface.
Once the filling is evenly spread, it should fill the crust right to the edges. Give it a light tap on the counter to remove any air bubbles that may have formed. This will help create a more uniform texture. After smoothing the top, you can pop it back into the fridge while you prepare the Twix layer.
Adding Twix Pieces and Caramel Sauce
Now, let’s add the star of the show: Twix bars! Begin by chopping the Twix bars into small, bite-sized pieces. The size of the chunks can vary based on personal preference, but aim for pieces that are roughly the same size for a consistent texture throughout the cheesecake. Once you have your chopped Twix, sprinkle them evenly across the cheesecake filling.
Next, take your caramel sauce and drizzle it generously over the Twix pieces. This layer of gooey caramel not only adds flavor but also binds the Twix to the cheesecake, creating that signature Twix experience. If you prefer a more caramel-heavy dessert, you can adjust the amount of sauce used.
Repeating Layers and Finishing Touches
For an even more decadent experience, consider creating additional layers. If you want to repeat the process, simply spread another layer of cheesecake filling over the Twix and caramel. Follow it up with another layer of chopped Twix and caramel sauce, repeating the layering process until you reach your desired height.
Finish with a final layer of cheesecake filling, smoothing it out to create a professional-looking dessert. Once all layers are complete, cover the cheesecake with plastic wrap and return it to the refrigerator to chill.
Tips for Smoothing Layers and Achieving a Professional Look
To achieve a perfectly smooth surface on your cheesecake, consider these tips:
1. Use a Warm Spatula: Dipping your spatula in warm water before smoothing the top can help create a more polished finish. Wipe it dry after each pass to avoid mixing the layers underneath.
2. Chill Between Layers: If you’re adding multiple layers, chill the cheesecake briefly after each layer to allow it to set, which will make it easier to smooth the top layer.
3. Avoid Overmixing: When blending your cheesecake filling, mix just until combined to avoid incorporating too much air, which can lead to cracks later.
Creating the Delicious Twix Layer
The Twix layer is a delightful combination of chocolate, caramel, and crunch that perfectly complements the creamy cheesecake. As previously mentioned, this layer consists of chopped Twix bars combined with caramel sauce.
Ingredient Breakdown
– Chopped Twix Bars: The main star of this layer, adding both texture and flavor.
– Caramel Sauce: Enhances the sweetness and binds the Twix pieces together.
– Optional Ingredients: For those who enjoy a little extra texture, consider adding chopped pecans. These will introduce a nutty flavor and an additional crunch that pairs beautifully with the soft cheesecake filling.
Making the Irresistible Chocolate Drizzle
No dessert is complete without an eye-catching drizzle. The chocolate drizzle not only enhances the flavor but also elevates the presentation of your cheesecake.
Ingredients for Chocolate Drizzle
– Semi-Sweet Chocolate Chips: Offer rich chocolate flavor.
– Coconut Oil: This helps to thin the chocolate, making it easier to drizzle.
Step-by-Step Instructions for Melting and Drizzling Chocolate
1. Melt the Chocolate: In a microwave-safe bowl, combine the chocolate chips and a tablespoon of coconut oil. Microwave in short intervals (about 20-30 seconds), stirring in between until the chocolate is completely melted and smooth.
2. Check Consistency: If the mixture seems too thick, add a little more coconut oil to achieve the desired drizzling consistency.
3. Drizzle Over Cheesecake: Once your cheesecake has set in the refrigerator, use a spoon or a piping bag to drizzle the melted chocolate over the top. Start at one side and move in a back-and-forth motion to create an elegant pattern.
Techniques for Achieving a Smooth Consistency
– Stir Thoroughly: Make sure to stir the chocolate well after melting to ensure that it’s smooth and free of lumps.
– Control the Temperature: If your chocolate cools too much, it may harden. If this happens, simply reheat it slightly to restore its drizzling quality.
Tips for Drizzling Elegantly Over the Cheesecake
– Practice Your Technique: If you’re unsure of your drizzling skills, practice on a piece of parchment paper first.
– Use a Piping Bag: For more control, use a piping bag with a small tip to create fine lines of chocolate drizzle.
Chilling and Serving the Cheesecake
Refrigeration is key to achieving the perfect texture for your no-bake Twix cheesecake. After assembling all layers, ensure you allow it enough time to set properly.
Importance of Refrigeration for Setting the Cheesecake
The chilling process allows the cheesecake to firm up, making it easier to slice and serve. A well-set cheesecake will have a smooth, creamy texture that holds its shape beautifully.
Recommended Chilling Time for Optimal Texture
Allow the cheesecake to chill in the refrigerator for at least 4-6 hours, but for the best results, overnight is ideal. This extended chilling time ensures that all flavors meld together and the texture is just right.
Ideas for Presentation and Serving Suggestions
Presentation is everything when it comes to desserts. Here are some ideas to elevate your cheesecake’s visual appeal:
– Garnish with Twix Pieces: For added flair, sprinkle additional chopped Twix bars on top of the cheesecake before serving.
– Use Fresh Whipped Cream: Serve slices with a dollop of fresh whipped cream for an extra indulgent touch.
– Chocolate Shavings: Grate some chocolate over the top for an elegant finish.
Optional Garnishes to Enhance the Visual Appeal
Consider adding a few extra touches to make your cheesecake truly impressive:
– Caramel Drizzle: A light drizzle of caramel over the chocolate can create a stunning contrast and enhance the flavor.
– Mint Leaves: Fresh mint leaves can add a pop of color and a refreshing aroma that balances the sweetness of the cheesecake.
Why This No-Bake Twix Cheesecake is Perfect for Any Occasion
This no-bake Twix cheesecake is not only delicious but also incredibly versatile. It’s an ideal dessert for various occasions, whether you’re celebrating a birthday, hosting a holiday gathering, or simply indulging on a cozy night in.
Discussion of the Versatility of the Cheesecake for Various Events
The rich flavor profile and crowd-pleasing nature of this cheesecake make it suitable for any event. Its no-bake nature means you can prepare it ahead of time, freeing you up to enjoy your gathering without the stress of last-minute baking.
Highlighting Its Crowd-Pleasing Nature and Rich Flavor Profile
With its creamy texture, crunchy Twix pieces, and luscious caramel, this dessert is sure to impress guests of all ages. The combination of flavors is irresistibly indulgent, making it a favorite among chocolate lovers and cheesecake aficionados alike.
Mentioning Dietary Considerations
For those with dietary restrictions, it’s worth noting that you can easily make this cheesecake gluten-free by using gluten-free cookies for the crust. This ensures that everyone can enjoy this delightful treat.
Conclusion
Creating a decadent homemade no-bake Twix cheesecake is a rewarding and enjoyable experience. From the careful layering of the cheesecake filling to the finishing touches of chocolate drizzle, each step brings you closer to a stunning dessert that is sure to impress.
As you share this delightful cheesecake with friends and family, you’ll not only enjoy the delicious flavors but also the joy of creating something special. So gather your ingredients and embark on this sweet journey. Once you try this recipe, you’ll be eager to make it time and time again, delighting in the smiles it brings to those you share it with.