Introduction
Cheesy Chicken Wraps are a delightful culinary creation that has captured the hearts and stomachs of food enthusiasts around the globe. This dish stands out as a versatile and satisfying meal option, perfect for lunch, dinner, or even a hearty snack. With their flavorful combination of chicken, cheese, and fresh vegetables, these wraps are not only delicious but also incredibly easy to prepare. In today’s fast-paced world, the appeal of quick meals cannot be overstated, and Cheesy Chicken Wraps deliver just that, making them a family favorite.
What makes this recipe truly special is its adaptability. Whether you’re hosting a casual get-together, looking for a simple weeknight dinner, or prepping meals for the week, Cheesy Chicken Wraps can be tailored to suit any occasion. This article aims to provide a comprehensive step-by-step guide to making these wraps while also exploring some exciting variations that you can try at home.
Understanding Cheesy Chicken Wraps
At their core, Cheesy Chicken Wraps are a harmonious blend of cooked chicken, melted cheese, and an array of fresh vegetables, all enveloped in a tortilla. This dish draws inspiration from various global cuisines, showcasing the universal appeal of wraps and stuffed foods. From burritos in Mexican cuisine to shawarma in Middle Eastern fare, the concept of wrapping flavorful fillings in a soft, pliable base is a time-honored tradition. Cheesy Chicken Wraps encapsulate this tradition while adding a creamy, cheesy twist.
Nutritional Benefits of the Ingredients
One of the best aspects of Cheesy Chicken Wraps is their nutritional profile. Made with wholesome ingredients, these wraps can be a part of a balanced diet.
– Cooked Chicken: This lean protein source is essential for muscle repair and growth, making it a fantastic choice for anyone looking to maintain a healthy lifestyle.
– Shredded Cheddar Cheese: Rich in calcium and protein, cheddar cheese not only adds flavor but also contributes to bone health. The melting qualities of cheddar enhance the overall texture of the wraps, creating a delightful mouthfeel.
– Cream Cheese: This ingredient provides a creamy texture that binds the filling together. While it’s higher in fat than other cheeses, it can be used in moderation to create a rich flavor without overwhelming the dish.
– Fresh Vegetables: Adding spinach and bell peppers not only boosts the nutritional value of the wraps but also introduces vital vitamins and minerals. Spinach is packed with iron and fiber, while bell peppers are a great source of vitamin C. These veggies add color, crunch, and a fresh taste to the wraps.
– Tortillas: A staple in many diets, tortillas can be made from various grains, including wheat and corn. Whole-grain options offer additional fiber and nutrients, contributing to a more filling meal.
– Optional Sauces: Incorporating sauces like salsa or hot sauce can enhance flavor without adding excessive calories, making for a zesty finish to your wraps.
Versatility for Various Occasions
Cheesy Chicken Wraps are ideal for various occasions. Whether you’re preparing a quick weeknight dinner after a long day or looking to impress guests at a casual get-together, these wraps fit the bill perfectly. They can be made in large batches for meal prep, ensuring you have delicious, satisfying meals ready to go throughout the week.
Moreover, their customizable nature means that everyone can create their own perfect wrap. From choosing the type of tortilla to adding extra toppings or sauces, these wraps can cater to different tastes and dietary preferences, making them a hit for both kids and adults.
Ingredients Breakdown
To make the perfect Cheesy Chicken Wraps, you’ll need the following ingredients:
Cooked Chicken
For convenience, using rotisserie chicken is a game changer. It not only saves time but also provides a flavorful base for your wraps. If you prefer, you can also grill or bake chicken breasts and shred them at home.
Shredded Cheddar Cheese
Opt for sharp cheddar for a more robust flavor. The cheese should be freshly shredded for the best melting properties, which will create that gooey, cheesy goodness everyone loves.
Cream Cheese
Choose a full-fat cream cheese for a richer taste, or opt for a reduced-fat version if you’re watching your calorie intake. The cream cheese acts as a binder, adding creaminess to the filling.
Seasonings
A blend of garlic powder, onion powder, and paprika will elevate the flavor profile of your wraps significantly. These seasonings are essential in bringing out the best in the chicken and cheese.
Fresh Vegetables
– Spinach: A handful of fresh spinach adds nutrition and a pop of color.
– Bell Peppers: Choose a mix of colors for visual appeal and to pack in different vitamins.
Tortillas
You can choose from flour, whole wheat, or corn tortillas, depending on your dietary needs and preferences. Flour tortillas are soft and pliable, making them easy to wrap, while whole wheat options offer more fiber.
Optional Sauces
Consider adding salsa for a zesty kick, or hot sauce if you enjoy a bit of heat in your meals. These optional ingredients can greatly enhance the overall experience of your Cheesy Chicken Wraps.
Preparation Steps
Now that you have all your ingredients ready, it’s time to dive into the preparation of your Cheesy Chicken Wraps. Here’s a comprehensive guide to ensure that you achieve the perfect consistency and flavor.
Mixing the Filling
1. Prepare the Chicken: If using rotisserie chicken, shred it using two forks or your hands until you have bite-sized pieces. If you’re cooking chicken from scratch, ensure it is fully cooked and seasoned to your liking before shredding.
2. Cream Cheese Preparation: In a mixing bowl, combine the cream cheese with the shredded chicken. This step is crucial as the cream cheese will help bind the chicken and cheese together, creating a cohesive filling. Use a spatula or fork to mix thoroughly until the chicken is well-coated.
3. Add Cheddar Cheese: Gradually fold in the shredded cheddar cheese. This will add a rich flavor and creaminess to the filling. Make sure the cheese is evenly distributed throughout the mixture.
4. Incorporate Seasonings: Sprinkle in the garlic powder, onion powder, and paprika. Mix well to ensure that the seasonings are evenly spread throughout the filling. Taste and adjust the seasoning if necessary; feel free to add a pinch of salt or pepper if desired.
5. Add Fresh Vegetables: Finally, fold in the fresh spinach and diced bell peppers. Their bright colors and crunch will provide a refreshing contrast to the creamy filling.
6. Achieving the Right Consistency: The filling should be creamy yet firm enough to hold its shape inside the tortilla. If the mixture seems too thick, you can add a tablespoon of sour cream or a splash of chicken broth to loosen it up slightly.
Now that you have your filling ready, you can proceed to assemble your Cheesy Chicken Wraps, but we’ll cover that in the next part of the article. With this detailed guide, you are well on your way to creating a delicious meal that will delight your family and friends. Stay tuned for more tips and the assembly process in the continuation of this recipe!
Sautéing the Vegetables
Sautéing is one of the most effective cooking methods to enhance the flavor and texture of your ingredients. For Cheesy Chicken Wraps, we will be sautéing bell peppers and onions, which add a delightful sweetness and crunch to the dish.
Techniques for Perfect Sautéing:
1. Choose the Right Pan: A heavy-bottomed skillet or sauté pan is ideal for even heat distribution. Non-stick pans can also work well to prevent sticking.
2. Preheat the Pan: Make sure your pan is hot before adding oil. This helps to sear the vegetables, locking in their flavors. A medium-high heat is usually perfect for sautéing.
3. Use the Right Oil: While olive oil is a popular choice, you can also use vegetable oil or avocado oil, which have higher smoke points. This prevents the oil from burning and developing an unpleasant flavor.
4. Don’t Overcrowd the Pan: If you’re sautéing a large batch, do it in batches. Crowding the pan can lead to steaming instead of sautéing, resulting in soggy vegetables.
5. Stir Occasionally: Allow the vegetables to sit undisturbed for a minute or two before stirring. This helps achieve a nice caramelization on the edges.
6. Season Well: Season the vegetables with salt and pepper while they are cooking to enhance their natural flavor. You can also add garlic or spices like cumin and paprika for added depth.
By following these techniques, your sautéed vegetables will not only taste delicious but also provide the perfect complement to your cheesy chicken filling.
Preparing the Tortillas
Warming tortillas properly is essential for achieving a flexible wrap that holds all your ingredients without tearing. Here are a few methods to effectively warm tortillas:
1. Skillet Method: Place a dry skillet over medium heat. Add a tortilla and warm for about 30 seconds on each side until it is pliable and lightly toasted. This method enhances the flavor while keeping the tortilla soft.
2. Oven Method: Preheat your oven to 350°F (175°C). Wrap a stack of tortillas in aluminum foil and place them in the oven for about 10-15 minutes. This method is great for warming multiple tortillas at once.
3. Microwave Method: Place a tortilla on a microwave-safe plate, cover it with a damp paper towel, and microwave on high for about 15-20 seconds. The steam from the paper towel will help keep the tortilla moist.
4. Steaming Method: If you have a steamer, you can steam the tortillas for a few minutes. This method yields soft, warm tortillas ideal for wrapping.
Choose the method that best suits your kitchen setup and the number of tortillas you need. Properly warmed tortillas will make assembling your wraps easier and more enjoyable.
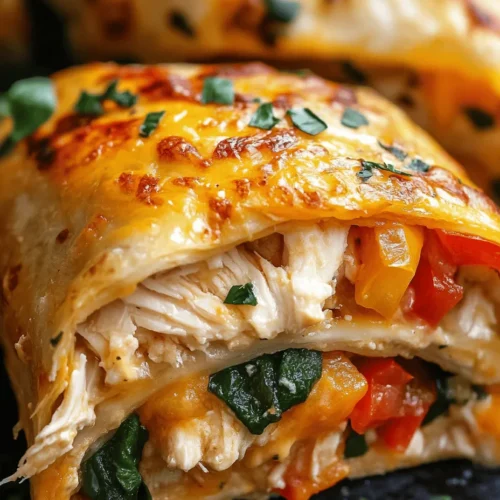
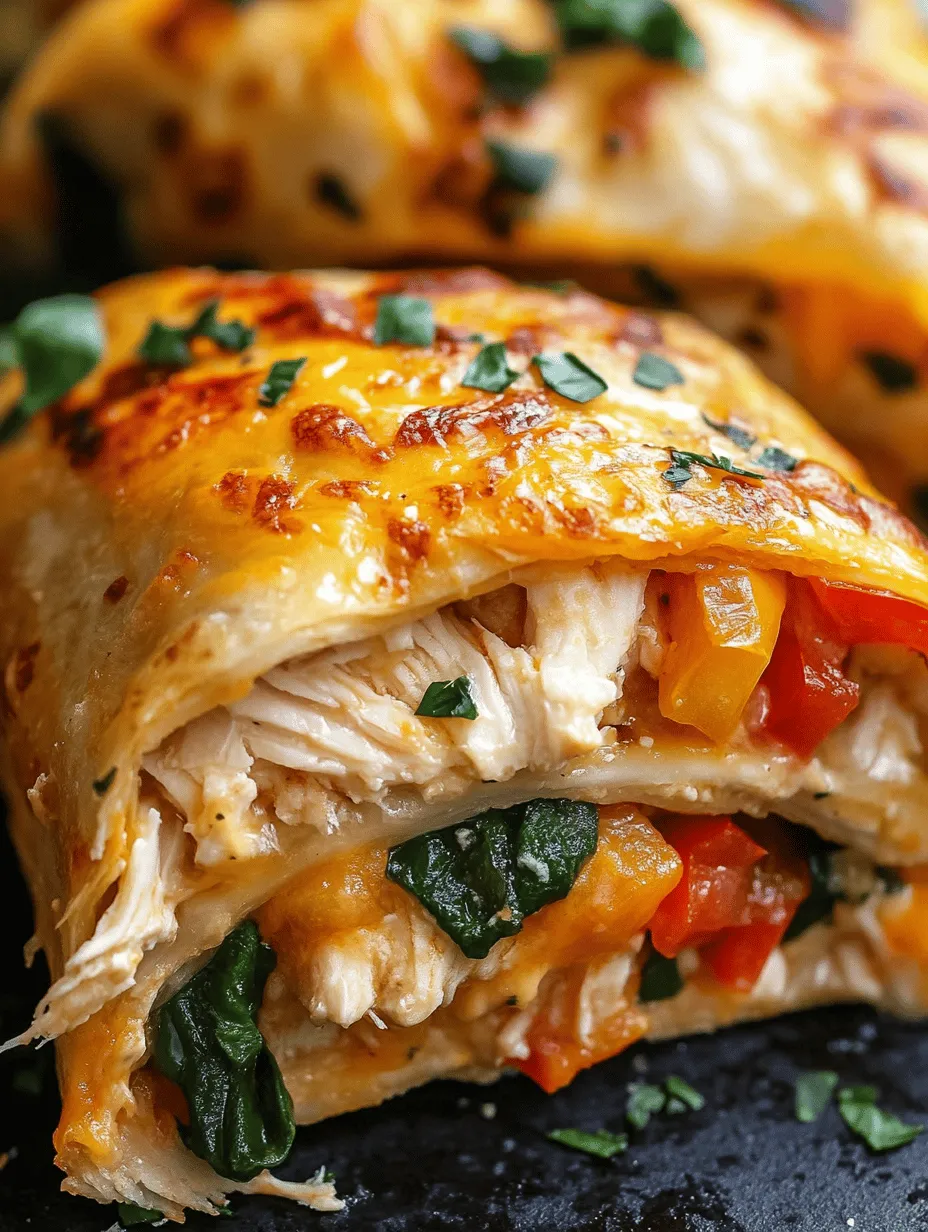
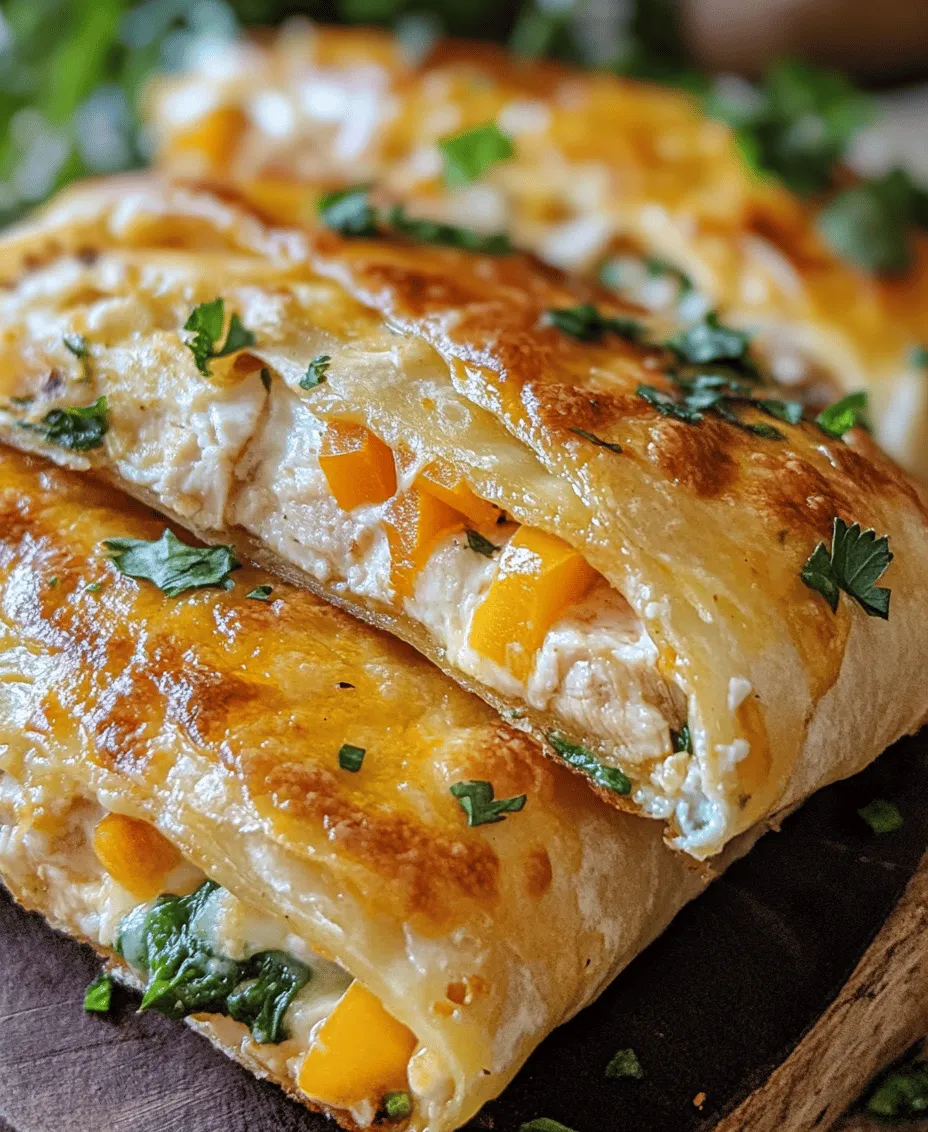
Assembling the Wraps
Assembling your Cheesy Chicken Wraps is an art that combines technique with creativity. Here’s a step-by-step walkthrough on how to fill and roll your wraps properly:
1. Lay the Tortilla Flat: Place your warmed tortilla on a clean cutting board or plate.
2. Add the Filling: Start with a scoop of the sautéed chicken and vegetable mixture. Aim to place the filling slightly off-center, towards the bottom third of the tortilla. This allows enough space to roll without overstuffing.
3. Layer the Cheese: Sprinkle a generous amount of shredded cheese over the filling. This will melt beautifully during cooking and bind the ingredients together.
4. Fold in the Sides: Gently fold the sides of the tortilla towards the center. This helps to contain the filling and keeps everything intact.
5. Roll It Up: Starting from the bottom (where the filling is), roll the tortilla tightly upwards. Ensure that the filling is secured within as you roll.
6. Secure the Wrap: If desired, you can use a toothpick to hold the wrap together, or place the seam side down when cooking.
7. Repeat: Continue this process for the remaining tortillas and filling.
Taking your time during assembly will ensure that each wrap is perfectly filled and rolled, making for an aesthetically pleasing meal.
Toasting the Wraps
Toasting your Cheesy Chicken Wraps brings a satisfying crunch and enhances their flavor. Here are the benefits of toasting versus baking:
1. Texture: Toasting in a skillet or on a grill creates a crispy exterior while keeping the inside warm and gooey. This contrast in texture elevates your eating experience.
2. Flavor Development: The toasting process caramelizes the sugars in the tortilla and filling, creating a rich, savory flavor profile that is hard to achieve through baking alone.
3. Speed: Toasting is generally quicker than baking, allowing you to prepare your meal more efficiently.
To toast your wraps, heat a skillet over medium heat and place your assembled wraps seam-side down. Cook for about 2-3 minutes on each side until golden brown and crispy. Alternatively, you can use a panini press for an even more compact and crispy result.
Serving Suggestions
Cheesy Chicken Wraps are versatile and can be paired with various side dishes to create a well-rounded meal. Here are some ideas:
1. Salads: A fresh green salad with a tangy vinaigrette complements the richness of the wraps. Consider a simple arugula salad with cherry tomatoes and balsamic dressing.
2. Fries: Crispy sweet potato fries or regular French fries are a delightful side that pairs well with the cheesy goodness of the wraps.
3. Vegetable Sides: Grilled or roasted vegetables can add an extra layer of nutrition and flavor to your meal. Consider zucchini, bell peppers, or asparagus.
To elevate the dining experience, consider presenting the wraps on a large platter, garnished with fresh herbs or lime wedges. This not only looks appealing but also invites guests to customize their plates.
Exploring Dipping Sauces
To further enhance your Cheesy Chicken Wraps, consider offering a variety of dipping sauces. While salsa and hot sauce are classics, there are many other options to explore:
1. Guacamole: Creamy and rich, guacamole adds an avocado flavor that pairs beautifully with the wraps.
2. Ranch Dressing: A cool and tangy ranch dressing can balance the heat from the filling and adds a delightful creaminess.
3. Honey Mustard: A sweet and tangy honey mustard sauce can offer a surprising twist that complements the savory elements of the wraps.
4. Tzatziki Sauce: This Greek yogurt-based sauce brings a fresh flavor that can lighten up the meal while adding a delicious creaminess.
5. Chipotle Aioli: For those who enjoy a smoky flavor, a chipotle aioli can add depth and a hint of spice.
By providing a selection of dipping sauces, you allow guests to personalize their experience and enjoy a variety of flavors with each bite.
Variations of Cheesy Chicken Wraps
One of the best aspects of Cheesy Chicken Wraps is their versatility. Here are some variations to consider:
1. Different Proteins: If chicken isn’t your preference, try swapping it out for ground turkey, beef, or even shredded pork. For a vegetarian option, consider using grilled tofu or tempeh seasoned with the same spices.
2. Flavor Variations: Experiment with different spices and herbs to give your wraps a unique twist. Try adding taco seasoning for a Mexican flair, or Italian herbs like oregano and basil for a Mediterranean touch.
3. Seasonal Produce: Utilize seasonal vegetables to keep things fresh and exciting. In summer, add fresh corn, zucchini, or even diced tomatoes; in fall, consider roasted butternut squash or spinach.
By adjusting the proteins, spices, and vegetables, you can create an array of Cheesy Chicken Wraps that cater to different tastes and dietary preferences.
Storing and Reheating Instructions
If you have leftovers, proper storage and reheating methods are crucial to maintaining the quality of your Cheesy Chicken Wraps.
Storing Leftovers:
– Allow the wraps to cool to room temperature before placing them in an airtight container.
– Store the wraps in the refrigerator for up to 3 days. For longer storage, consider freezing them. Wrap each individually in plastic wrap and then place them in a freezer-safe bag.
Reheating Tips:
1. Microwave: For quick reheating, place the wrap on a microwave-safe plate, cover with a damp paper towel, and heat on high for 30-60 seconds until warmed through.
2. Skillet: To retain the crispy texture, heat a skillet over medium heat and toast the wraps for 2-3 minutes on each side until heated through.
3. Oven: Preheat your oven to 350°F (175°C) and place the wraps on a baking sheet. Heat for about 10-15 minutes until warm.
These methods will help ensure that your Cheesy Chicken Wraps taste as good as when they were freshly made.
Nutritional Information
Understanding the nutritional value of your Cheesy Chicken Wraps can help you make informed choices. Here’s a breakdown of the nutritional value per serving (1 wrap):
– Calories: Approximately 400-500 calories (depending on fillings and sauces)
– Protein: 25-30 grams from chicken and cheese
– Carbohydrates: 30-35 grams from tortillas and vegetables
– Fat: 15-20 grams, largely from cheese and any added oils
Dietary Considerations:
– Gluten-Free: Substitute regular tortillas with gluten-free varieties made from corn or other gluten-free grains.
– Low-Carb: For a low-carb option, use lettuce wraps instead of tortillas, or explore cauliflower-based tortillas.
Being mindful of these nutritional aspects allows you to customize your Cheesy Chicken Wraps to fit your dietary needs and preferences.
Conclusion
Cheesy Chicken Wraps are a delightful combination of flavors and textures that make for a satisfying meal any time of day. Their versatility allows for endless customization, making them perfect for families, gatherings, or even meal prep.
Encouraging creativity in the kitchen can transform a simple recipe into a personal culinary masterpiece that reflects your tastes and dietary needs. Whether you choose to stick with the classic recipe or explore the myriad of variations, the joy of cooking and sharing meals with loved ones is what truly makes the experience special.
So gather your ingredients, put on your apron, and let the delicious possibilities of Cheesy Chicken Wraps inspire your next meal!