
Introduction
In the realm of desserts, few treats can match the nostalgic charm of a classic banana split. The combination of creamy ice cream, luscious toppings, and fresh fruits creates a delightful experience that many of us cherish from our childhood. However, not everyone has the time or the inclination to create elaborate desserts. Enter the Chilled Delight: No-Bake Banana Split Cake—a seamless fusion of the beloved flavors of the traditional dessert into an easy, no-bake format that is perfect for any occasion.
This innovative recipe transforms the iconic banana split into a layered cake that is as visually appealing as it is delicious. With layers of creamy goodness, fresh fruits, and a buttery graham cracker crust, this dessert is not only a crowd-pleaser but also a breeze to make. Ideal for summer gatherings, birthday parties, or just a sweet indulgence at home, this chilled treat will surely leave everyone asking for seconds.
In this article, we will delve into the essential ingredients that bring this dessert to life, providing you with a comprehensive understanding of each component’s role and how to achieve the best results. We’ll also guide you through the step-by-step instructions for creating this delightful cake, ensuring that you can replicate it with ease. Get ready to embark on a culinary adventure that will elevate your dessert game!
Understanding the Ingredients
To craft the perfect Chilled Delight: No-Bake Banana Split Cake, it is essential to understand the key components that make this dessert a standout. Each ingredient plays a pivotal role in achieving the right texture, flavor, and overall appeal. Let’s explore these ingredients in detail.
Graham Crackers
At the base of our no-bake banana split cake lies the graham cracker crust. Graham crackers are a classic choice for many no-bake desserts due to their sweet flavor and ideal texture. When crushed and mixed with melted butter, they create a sturdy and flavorful foundation that perfectly complements the creamy layers above.
If you’re looking for gluten-free options, there are many alternatives available on the market today. Gluten-free graham cracker crumbs can be found in most grocery stores, or you can substitute them with crushed gluten-free cookies. Not only does this ensure that those with dietary restrictions can enjoy this dessert, but it also adds a unique twist to the flavor profile of the crust.
Cream Cheese and Sour Cream
The creamy layers of this cake are achieved using a combination of cream cheese and sour cream. The cream cheese adds a rich and tangy flavor, while the sour cream contributes to a smooth and velvety texture that is essential for this dessert. When blended together, these two ingredients create a luxurious filling that perfectly balances sweetness and creaminess.
For those with dietary preferences or restrictions, there are suitable substitutes available. For instance, Greek yogurt can be used in place of sour cream for a lighter version, while vegan cream cheese is an excellent alternative for those avoiding dairy altogether. These substitutions ensure that everyone can enjoy the deliciousness of this cake without compromising on flavor or texture.
Whipping Cream
Heavy whipping cream is pivotal in creating the lightness and volume of the banana split cake. When whipped to perfection, it adds an airy quality that makes each bite feel indulgent without being overly rich. The whipped cream not only enhances the texture but also serves to lighten the overall dessert, allowing the flavors of the other ingredients to shine through.
To achieve the perfect whipped consistency, it’s essential to start with cold cream and use a chilled mixing bowl. Whipping the cream until stiff peaks form ensures that it holds its shape when layered into the cake, creating a delightful contrast with the denser cream cheese layer.
Fruits
A classic banana split wouldn’t be complete without the inclusion of fresh fruits. In this no-bake banana split cake, ripe bananas, juicy strawberries, and sweet pineapple are the stars of the show. Each fruit adds its unique flavor profile and contributes to the overall freshness of the dessert.
Bananas provide a creamy, soft texture, while strawberries add a tartness that balances the sweetness of the other ingredients. Pineapple brings a tropical flair and a juicy burst of flavor that complements the richness of the cake. When selecting fruits, it’s best to opt for the freshest available to ensure maximum flavor and visual appeal.
Chocolate Syrup and Walnuts
To elevate the flavor of our Chilled Delight, we incorporate chocolate syrup and walnuts. The chocolate syrup not only adds a delightful sweetness but also enhances the dessert’s overall richness. Drizzling it over the top before serving turns this cake into a show-stopping centerpiece for any gathering.
Walnuts contribute a crunchy texture that contrasts beautifully with the creamy layers of the cake. Their earthy flavor adds depth and complexity, making each bite an enjoyable experience. If you prefer, you can substitute walnuts with other nuts, such as pecans or almonds, or even use a nut-free option like toasted coconut for a different twist.
Step-by-Step Instructions
Now that we’ve explored the ingredients that make this dessert a true delight, it’s time to dive into the step-by-step instructions for creating the Chilled Delight: No-Bake Banana Split Cake. Follow these detailed steps to ensure your cake turns out perfectly every time.
Preparing the Graham Cracker Crust
1. Crush the Graham Crackers: Start by placing the graham crackers in a zip-top bag and using a rolling pin to crush them into fine crumbs. Alternatively, you can use a food processor for a quicker method. Aim for a texture similar to sand—this will help create a sturdy crust.
2. Mix with Butter: In a mixing bowl, combine the crushed graham crackers with melted butter. The butter acts as a binding agent, helping the crumbs hold together when pressed into the pan. Stir the mixture until all the crumbs are evenly coated.
3. Press into the Pan: Take a 9×13-inch baking dish (or any similar-sized dish) and firmly press the graham cracker mixture into the bottom, ensuring it’s evenly distributed across the entire surface. Use the back of a measuring cup or your fingers to pack it tightly. This step is crucial for a solid crust that won’t crumble when you cut into the cake.
4. Chill the Crust: Place the crust in the refrigerator for about 15-20 minutes to allow it to set. This chilling time helps firm up the butter, making the crust more stable for the layers that will follow.
Creating the Cream Cheese Layer
1. Blend the Cream Cheese and Sour Cream: In a large mixing bowl, using an electric mixer, beat the cream cheese until smooth and creamy. Then add the sour cream and continue mixing until the two are well combined. This step helps to achieve a creamy texture without lumps.
2. Incorporate the Whipped Cream: In a separate bowl, whip the heavy cream until stiff peaks form. Gently fold the whipped cream into the cream cheese mixture using a rubber spatula. Be careful not to deflate the whipped cream—this will keep the filling light and airy.
3. Layering the Cream Cheese Mixture: Once the whipped cream is fully incorporated, spread the cream cheese layer evenly over the chilled graham cracker crust. Use a spatula to smooth the top, ensuring there are no gaps.
Layering the Ingredients
1. Add the Sliced Bananas: Take ripe bananas and slice them into thin rounds. Evenly distribute the banana slices over the cream cheese layer, ensuring they cover the entire surface.
2. Top with Strawberries and Pineapple: Next, add sliced strawberries and pineapple chunks (fresh or canned, drained) over the bananas. The combination of these fruits not only makes for a visually stunning dessert but also offers a delightful mix of flavors.
3. Drizzle with Chocolate Syrup: Before adding the final layer, drizzle some chocolate syrup over the fruit layer. This adds sweetness and enhances the overall flavor profile of the cake.
4. Finalize with Whipped Cream: Finish the layering process by adding another layer of whipped cream on top of the fruit. Spread it evenly, creating a smooth surface for presentation.
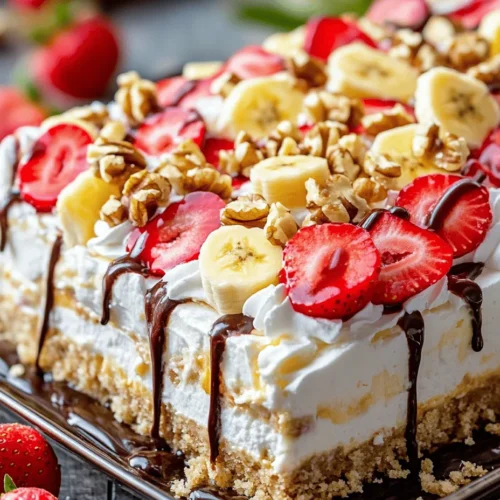
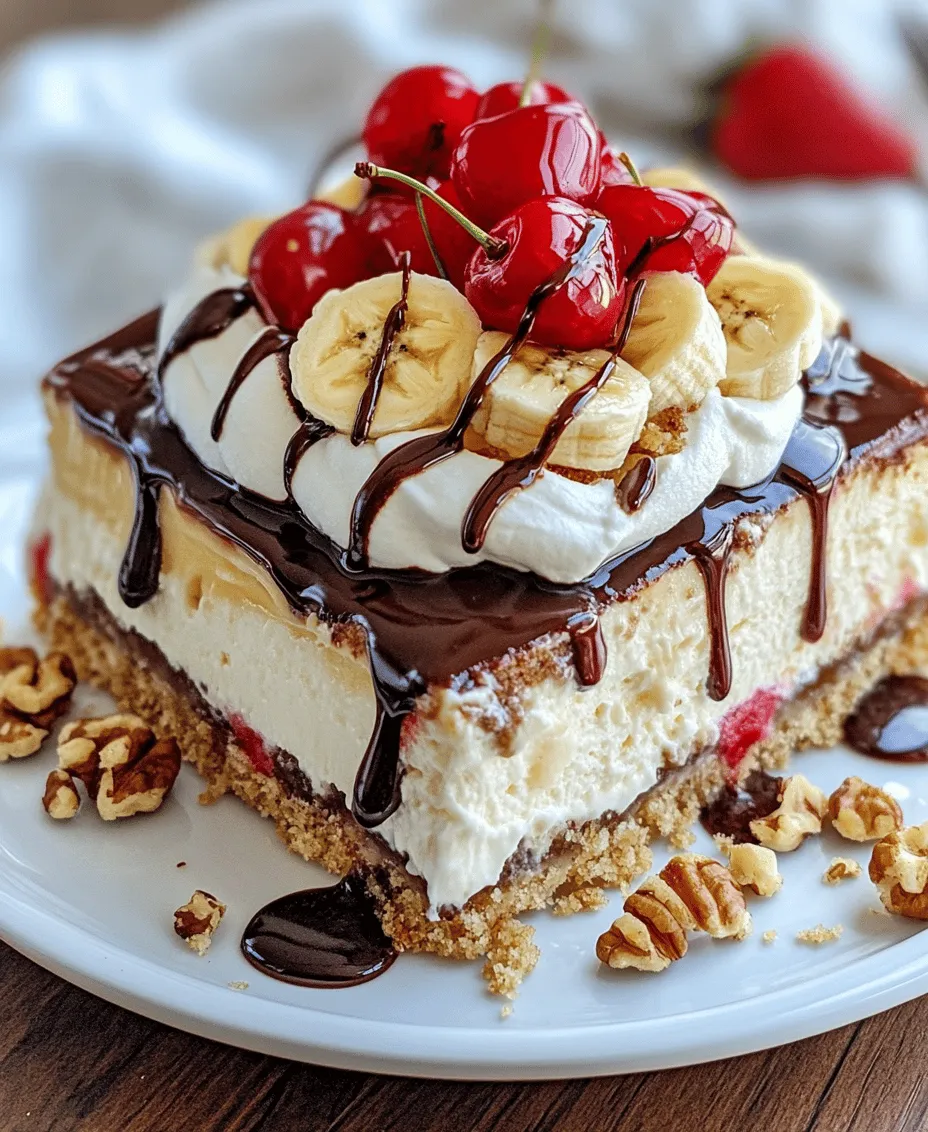
5. Garnish with Walnuts: Finally, sprinkle chopped walnuts (or your preferred nut topping) on top of the whipped cream layer for added crunch and flavor.
This no-bake banana split cake is now ready for chilling in the refrigerator. Allow it to set for at least 4 hours, or ideally overnight, to ensure that all the flavors meld together beautifully.
As you prepare to serve this delightful dessert, remember that the presentation is key. Consider garnishing with additional chocolate syrup and fresh fruit right before serving for an extra touch of elegance.
Stay tuned for the next part of this article, where we’ll explore tips for best results and answer some common questions about making this delightful no-bake banana split cake.
Evenly Layering Each Ingredient
Creating the Chilled Delight: No-Bake Banana Split Cake is an art that involves layering ingredients to achieve a harmonious balance of flavors and textures. Start with the graham cracker crust as your foundational layer. Ensure it’s firmly pressed into the bottom of your dish to provide a sturdy base. When adding the banana slices, arrange them in a single layer, ensuring they cover the entire crust without any gaps. This not only enhances the visual appeal but also guarantees that every slice of cake gets a taste of banana.
Next, spread the cream cheese mixture carefully over the bananas. Use an offset spatula or the back of a spoon to achieve an even layer. This technique helps prevent the bananas from shifting and ensures that each bite contains a perfect blend of flavors. If you have opted to add a layer of crushed pineapple, make sure to drain it thoroughly before spreading it over the cream cheese layer. Excess moisture can make the crust soggy and disrupt the layering process.
Adding the Chocolate Sauce
Drizzling chocolate sauce over the fruit layer is where you can get creative and artistic. To achieve a beautiful drizzle, use a squeeze bottle or a piping bag filled with chocolate syrup. Hold the bottle or bag above the cake and gently squeeze while moving your wrist back and forth, allowing the syrup to fall in a controlled manner. This technique creates an elegant pattern that not only enhances the presentation but also ensures that the chocolate flavor is evenly distributed.
Alternatively, if you prefer a more rustic look, you can simply use a spoon to drizzle the chocolate sauce. Start from one side of the cake and let the chocolate flow liberally, allowing it to cascade over the edges for an enticing effect. Remember, the goal is to make the cake as visually appealing as it is delicious.
Finishing with Whipped Cream
Topping the cake with whipped cream is a crucial step that adds both flavor and visual appeal. For a fluffy and well-defined finish, use heavy cream that has been chilled. Whip the cream until soft peaks form, being careful not to over-whip it, which can lead to a grainy texture. Once whipped, you can either spread the cream with a spatula or pipe it onto the cake using a star tip for a decorative finish.
If you choose to pipe the whipped cream, start from the outer edge and work your way inward, creating a beautiful swirl that draws the eye. This finishing touch not only enhances the cake’s look but also adds a light, airy component that balances the richness of the cream cheese and chocolate layers.
Garnishing the Cake
Garnishing the Chilled Delight: No-Bake Banana Split Cake is where you can truly let your creativity shine. Fresh fruit is always a fantastic choice; consider adding slices of strawberries, additional banana rounds, or even some blueberries for a pop of color. For a classic touch, you can add maraschino cherries on top of the whipped cream, mimicking the traditional banana split.
Another fun idea is to sprinkle chopped nuts, such as walnuts or pecans, over the whipped cream for a bit of crunch. Chocolate shavings or curls can also elevate the dessert, adding a luxurious feel. These garnishes not only enhance the cake’s visual appeal but also contribute additional flavors and textures that elevate the overall experience.
Chilling Time
Once your cake is assembled and beautifully garnished, it’s important to let it chill in the refrigerator. This chilling time is crucial as it allows the flavors to meld together and the cake to set properly. Ideally, let the cake chill for at least 4 to 6 hours, or overnight if you have the time. This extended refrigeration not only improves the taste but also makes slicing and serving easier, as the layers will hold together more effectively.
Serving Suggestions
When it comes to serving the Chilled Delight: No-Bake Banana Split Cake, presentation is key. Consider slicing the cake into squares or wedges for individual servings. For a more elegant touch, serve each piece on a dessert plate with a dollop of extra whipped cream or a drizzle of chocolate sauce.
If you want to impress your guests further, consider serving the cake alongside a scoop of vanilla ice cream. The combination of the cold, creamy cake with the warm weather is a delightful treat. You can also pair it with fresh fruit or a small bowl of additional chocolate sauce for dipping.
Presentation Ideas
To enhance the visual appeal of your cake, consider using decorative serving platters or stands. A tiered cake stand can add height and drama to your dessert table. Arrange the cake on a colorful plate or one that contrasts beautifully with the cake’s colors, making it pop.
You can also add edible flowers around the cake for a touch of elegance. They not only make the cake look stunning but also provide a hint of freshness. If you have leftover garnishes, use them to create a small fruit arrangement on the side of the plate for added color and interest.
Accompaniments
To complement the Chilled Delight: No-Bake Banana Split Cake, consider serving it with a variety of desserts or beverages. A light, fruity sorbet or a scoop of rich vanilla ice cream pairs wonderfully with the cake. For those looking for a refreshing drink, iced tea or lemonade can be great options that balance the sweetness of the cake.
If you want to create a dessert platter, consider adding some brownies or mini cheesecakes as additional sweet treats. This variety ensures that there is something for everyone and enhances your dessert spread at gatherings.
Nutritional Information
Understanding the nutritional profile of the Chilled Delight: No-Bake Banana Split Cake can help you make informed decisions about enjoying this delightful dessert. Per serving, the cake typically contains approximately 300-350 calories, depending on portion size and specific ingredients used. The breakdown includes approximately 18 grams of fat, 35 grams of carbohydrates, and 4 grams of protein.
Calories and Macros
– Calories: 300-350
– Fat: 18 grams
– Carbohydrates: 35 grams
– Protein: 4 grams
This profile can vary based on the specific brands of ingredients used and any modifications you may choose to make. For example, using light cream cheese or a sugar substitute can help reduce calorie content while still maintaining flavor.
Dietary Considerations
For those with dietary restrictions, the Chilled Delight: No-Bake Banana Split Cake can be adapted to fit various needs. To create a lower-sugar version, consider using sugar-free pudding mix and a sugar substitute in the whipped cream. You can also opt for dairy-free alternatives, such as coconut cream for the whipped topping and almond milk-based cream cheese.
Additionally, gluten-free graham crackers are available for those needing to avoid gluten, making this cake accessible to a wider audience. By customizing this recipe, you can enjoy the deliciousness of the Chilled Delight: No-Bake Banana Split Cake while accommodating different dietary preferences.
Conclusion
The Chilled Delight: No-Bake Banana Split Cake is a delightful dessert that perfectly captures the essence of summer treats while being accessible year-round. With its luscious layers and easy preparation, it’s ideal for gatherings, parties, or simply enjoying a sweet moment at home. The combination of creamy, fruity, and chocolatey elements makes this dessert not just a recipe, but an experience to savor.
Whether you’re a seasoned baker or a novice in the kitchen, this no-bake cake is sure to impress. Embrace the joy of creating and indulging in a treat that brings smiles to faces and warmth to hearts. So gather your ingredients, unleash your creativity, and enjoy every delicious bite of this chilled delight.