Introduction
Valentine’s Day is a time for love, romance, and heartfelt gestures, and what better way to express your affection than through the gift of homemade treats? Sharing something delicious with those you cherish can create lasting memories, and nothing embodies that spirit quite like our Sweet and Savory Valentine’s Peanut Butter Cookie Bars. These delightful bars are not only a feast for the eyes but also a treat for the palate, making them the perfect dessert choice to celebrate love.
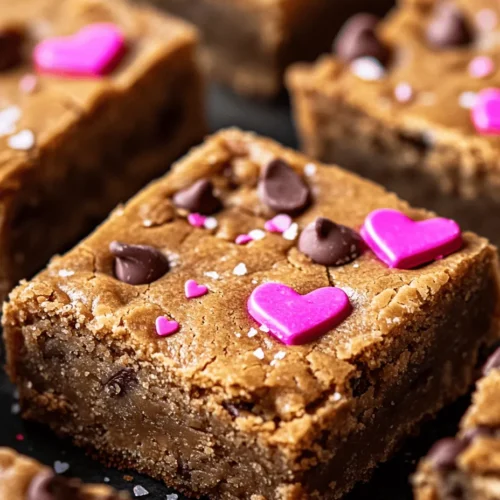
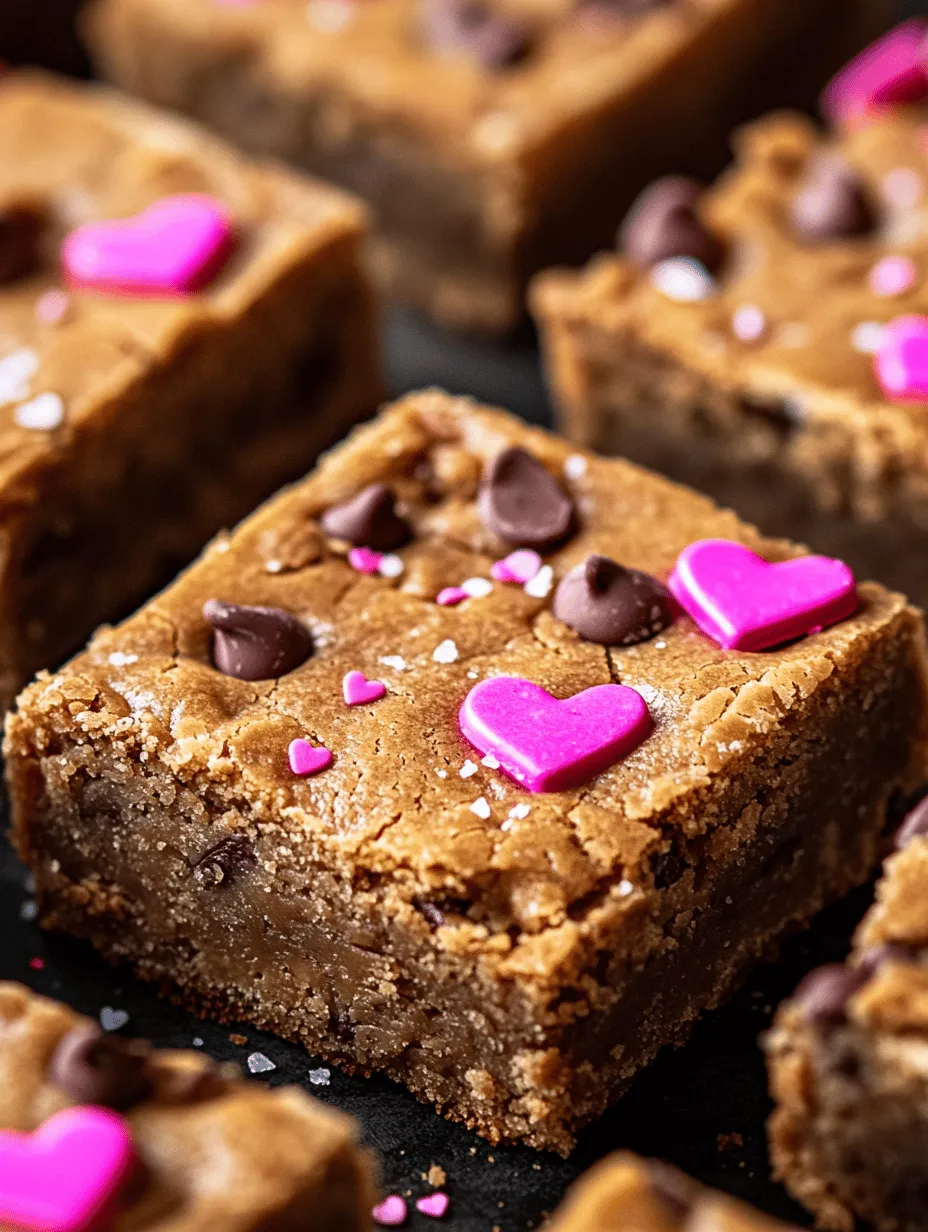
What sets these cookie bars apart is their unique combination of flavors and textures. The creamy richness of peanut butter harmonizes beautifully with the sweetness of milk chocolate, while the optional addition of walnuts adds a satisfying crunch. Topped with a sprinkle of sea salt and vibrant heart-shaped decorations, these cookie bars are as pleasing to the eye as they are to the taste buds. Whether you’re preparing them for a romantic dinner, a gathering with friends, or simply to indulge yourself, these cookie bars will surely make your Valentine’s Day extra special.
The Allure of Peanut Butter in Desserts
Peanut butter is a beloved ingredient in many sweet recipes, and for good reason. Its creamy texture and nutty flavor make it a versatile addition to an array of desserts, from cookies to cakes and even pies. The popularity of peanut butter in the culinary world can be attributed to its ability to elevate flavors while providing a rich and satisfying mouthfeel.
Beyond its deliciousness, peanut butter is also a nutritional powerhouse. It is packed with protein, healthy fats, and essential vitamins and minerals, making it a guilt-free indulgence. The protein content in peanut butter can help keep you feeling full, while the healthy fats contribute to heart health. Additionally, peanut butter is a good source of vitamin E, magnesium, and potassium, adding to its appeal as a wholesome ingredient.
When incorporated into desserts, peanut butter not only enhances the flavor profile but also adds depth and complexity. It can balance sweetness, providing a savory note that contrasts beautifully with sugary elements. This sweet and savory combination is what makes our Valentine’s Peanut Butter Cookie Bars truly special, inviting you to savor each bite.
Key Ingredients and Their Roles
To achieve the perfect Sweet and Savory Valentine’s Peanut Butter Cookie Bars, it’s essential to understand the role of each ingredient in the recipe. Here’s a detailed look at the key components:
Creamy Peanut Butter
The star of our recipe, creamy peanut butter, serves as the primary flavor base. Its rich, nutty taste provides a delectable backdrop for the sweetness of the cookie bars. The smooth texture of creamy peanut butter allows for easy mixing and ensures that every bite is infused with that unmistakable peanut flavor. When selecting peanut butter, opt for a high-quality brand that contains minimal added ingredients—just peanuts and salt for the best results.
Unsalted Butter
Using unsalted butter in this recipe is crucial for flavor control. Unsalted butter allows you to manage the salt levels in your cookie bars, enabling you to achieve the perfect balance between sweetness and savory notes. Butter also contributes to the overall texture, lending a rich and tender crumb to the bars. Be sure to let the butter soften at room temperature for easier creaming with the sugars.
Sugar Varieties (Brown and Granulated)
This recipe calls for both brown sugar and granulated sugar, each serving a distinct purpose. Granulated sugar provides sweetness and structure, while brown sugar, with its molasses content, adds moisture and a subtle caramel flavor. The combination of these sugars creates a chewy texture that contrasts beautifully with the creaminess of the peanut butter, resulting in cookie bars that are both soft and satisfying.
Egg
The egg acts as a binding agent in our cookie bars, providing stability and structure. It helps to create a chewy texture while also contributing to the overall richness of the bars. When using eggs in baking, ensure they are at room temperature for optimal mixing and incorporation into the batter.
Vanilla Extract
Vanilla extract is a flavor enhancer that elevates the overall taste of the cookie bars. Its warm, aromatic notes complement the peanut butter and chocolate, creating a harmonious blend of flavors. Choose high-quality pure vanilla extract for the best results, as artificial flavors may not provide the same depth.
Flour, Baking Soda, and Salt
These ingredients form the foundation of the cookie bars. All-purpose flour provides structure, while baking soda acts as a leavening agent, helping the bars rise slightly during baking. A pinch of salt is essential as it enhances the flavors and balances the sweetness, ensuring that each bite is well-rounded.
Milk Chocolate Chips
Milk chocolate chips add a delightful burst of sweetness and richness to the cookie bars. Their creamy texture melts beautifully into the bars as they bake, creating pockets of chocolatey goodness. You can substitute semi-sweet or dark chocolate chips if you prefer a more intense chocolate flavor.
Optional Walnuts
For those who enjoy a bit of crunch, walnuts are an excellent optional addition. They provide texture and a nutty flavor that complements the peanut butter. If you’re nut-sensitive or prefer a smoother bar, feel free to omit them.
Sea Salt and Heart-Shaped Sprinkles
To finish off the Sweet and Savory Valentine’s Peanut Butter Cookie Bars, a sprinkle of sea salt enhances the flavors and adds an appealing contrast to the sweetness. Heart-shaped sprinkles not only add a festive touch but also make these cookie bars visually appealing—perfect for sharing on Valentine’s Day.
Preparation Steps: A Guide to Perfect Cookie Bars
Now that we’ve explored the key ingredients and their roles, let’s dive into the preparation steps for creating these delicious peanut butter cookie bars. The process is straightforward and can be accomplished in just a few simple steps, making it an accessible treat for bakers of all skill levels.
1. Preheat the Oven: Begin by preheating your oven to 350°F (175°C). This ensures that your cookie bars bake evenly and achieve the perfect texture.
2. Prepare the Baking Dish: Line an 8×8-inch baking dish with parchment paper, leaving some overhang on the sides for easy removal after baking. Lightly grease the parchment paper with cooking spray or butter to prevent sticking.
3. Cream the Butter and Sugars: In a large mixing bowl, combine the softened unsalted butter, granulated sugar, and brown sugar. Use an electric mixer to cream these ingredients together until light and fluffy. This process typically takes about 2-3 minutes. The air incorporated during this step is crucial for achieving a light texture in the finished cookie bars.
4. Add the Peanut Butter and Egg: Once the butter and sugars are well combined, add the creamy peanut butter, followed by the egg and vanilla extract. Mix until everything is fully incorporated and smooth. The mixture should be creamy and well-blended.
5. Combine Dry Ingredients: In a separate bowl, whisk together the all-purpose flour, baking soda, and salt. Gradually add this dry mixture to the wet ingredients, mixing on low speed until just combined. Be careful not to overmix, as this can result in dense cookie bars.
6. Fold in the Chocolate Chips and Walnuts: Gently fold in the milk chocolate chips and, if desired, the chopped walnuts. The batter will be thick and slightly sticky, so make sure the chocolate and nuts are evenly distributed throughout.
7. Transfer to the Baking Dish: Pour the cookie bar batter into the prepared baking dish. Use a spatula to spread it evenly, smoothing the top for a uniform appearance.
8. Add Sprinkle of Sea Salt: For an extra touch of flavor, sprinkle a pinch of sea salt over the top of the batter before baking. This will provide a delightful contrast to the sweetness of the cookie bars.
9. Bake: Place the baking dish in the preheated oven and bake for 25-30 minutes, or until the edges are golden and a toothpick inserted into the center comes out with a few moist crumbs. Keep an eye on the bars to prevent overbaking, as they will continue to firm up as they cool.
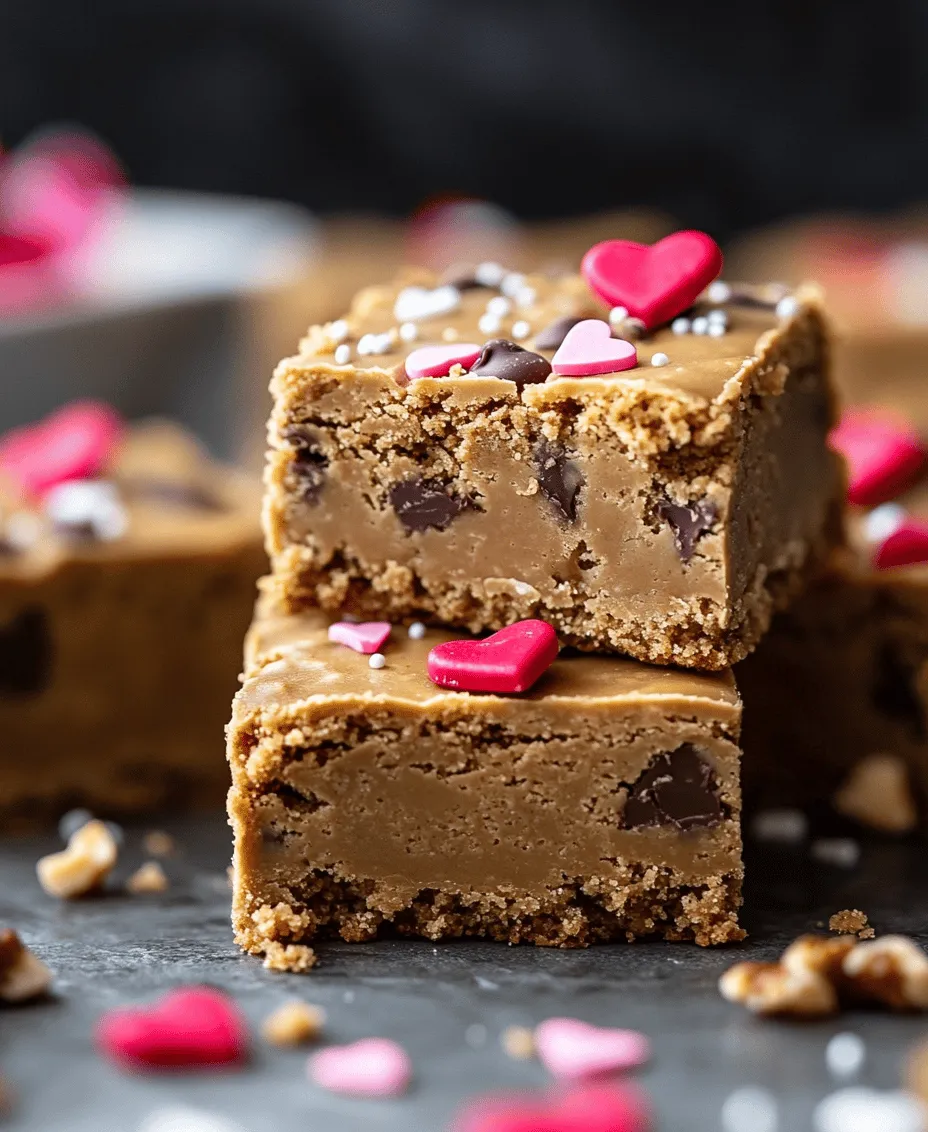
10. Cool and Decorate: Once baked, remove the dish from the oven and let it cool in the pan for about 10 minutes. Then, lift the bars out using the parchment paper overhang and transfer them to a wire rack to cool completely. Once cooled, feel free to decorate with heart-shaped sprinkles for that festive Valentine’s touch.
As you embark on this delicious baking journey, remember that the process is as enjoyable as the final product. Creating these Sweet and Savory Valentine’s Peanut Butter Cookie Bars is not just about satisfying your sweet tooth; it’s about sharing love through food, making cherished memories, and celebrating the joy of togetherness on this special day.
Step-by-Step Breakdown of the Preparation Process
Creating the perfect Sweet and Savory Valentine’s Peanut Butter Cookie Bars is an enjoyable journey that culminates in delicious treats. Each step requires attention to detail to ensure the best results. Here’s a comprehensive breakdown of the preparation process.
Prepping the Oven and Baking Pan
Before diving into the mixing, it is crucial to prepare your oven and baking pan properly. Preheat your oven to 350°F (175°C). Preheating is essential because it helps the cookie bars bake evenly and achieve that delightful golden-brown color. While the oven heats, take a 9×13-inch baking pan and line it with parchment paper. This step is pivotal for several reasons: it prevents sticking, facilitates easy removal of the cookie bars, and simplifies cleanup. Make sure to leave some overhang, which will act as handles for lifting the bars out after baking.
Mixing Wet Ingredients
In a large mixing bowl, cream together the wet ingredients: 1 cup of creamy peanut butter, 1/2 cup of unsalted butter (softened to room temperature), and 1 cup of brown sugar. Use an electric mixer set to medium speed for about 2-3 minutes until the mixture is smooth and creamy. This step is crucial because the creamy consistency not only enhances the texture of your cookie bars but also ensures that the sugar is well incorporated, contributing to their sweetness. For a touch of flavor, add in 2 teaspoons of vanilla extract, blending it well into the mixture.
Combining Dry Ingredients
In a separate bowl, whisk together your dry ingredients: 2 cups of all-purpose flour, 1 teaspoon of baking soda, and 1/2 teaspoon of salt. Whisking these ingredients ensures they are evenly distributed, which is vital for the leavening process during baking. The salt, while seemingly insignificant, plays an important role. It balances the sweetness of the brown sugar and peanut butter, enhancing the overall flavor profile of your cookie bars. Gradually add the dry mixture to the wet ingredients, mixing on low speed until just combined. Avoid overmixing, as this can lead to tough bars.
Folding in Chocolate Chips and Walnuts
Once your dough is ready, it’s time to fold in 1 cup of semi-sweet chocolate chips and 1 cup of chopped walnuts. Use a spatula or wooden spoon to gently combine these ingredients into the dough. Folding instead of stirring helps maintain the texture and prevents the chocolate chips and walnuts from breaking apart. The chocolate chips add a rich sweetness, while the walnuts provide a satisfying crunch that complements the soft cookie bars.
Baking
Spread the cookie dough evenly into your prepared baking pan, smoothing out the top with a spatula. Bake the cookie bars in your preheated oven for 20-25 minutes, or until the edges are lightly golden and a toothpick inserted into the center comes out with a few moist crumbs. Keep an eye on the baking process, as ovens can vary. Overbaking can lead to dry cookie bars, while underbaking may result in a gooey center.
Cooling and Cutting
Once baked, remove the pan from the oven and place it on a wire rack to cool for about 10-15 minutes. This cooling period allows the cookie bars to set, making them easier to cut. After they have cooled slightly, use the parchment overhang to lift the bars out of the pan. Transfer them to a cutting board and slice them into squares or rectangles, depending on your serving preference. For a clean cut, use a sharp knife and wipe it down between cuts.
Flavor Combinations: Sweet and Savory Pairing
The beauty of the Sweet and Savory Valentine’s Peanut Butter Cookie Bars lies in their delightful flavor combination. The balance of sweet and savory is achieved through the harmonious interplay of ingredients. The richness of the peanut butter and brown sugar creates a luscious sweetness, while the addition of salt enhances this sweetness, giving it depth and complexity. The walnuts add a subtle earthiness, further enriching the flavor profile.
Pairing these cookie bars with beverages can elevate the tasting experience. A freshly brewed cup of coffee provides a robust contrast to the sweetness of the bars, enhancing the overall flavor. For a more indulgent treat, consider pairing them with a glass of cold milk, which balances the richness of the peanut butter. If you prefer a more sophisticated pairing, a light dessert wine, such as Moscato or a fruity red, complements the sweet and savory notes beautifully.
Presentation Ideas for Valentine’s Day
Presentation is key when it comes to serving your Sweet and Savory Valentine’s Peanut Butter Cookie Bars. Here are some creative suggestions to make your treats even more special:
– Decorative Serving Ideas: Consider using a heart-shaped platter to showcase your cookie bars. Arrange them neatly and garnish with a few fresh strawberries or raspberries for a pop of color. You can also dust the bars with powdered sugar for an elegant touch.
– Themed Decorations: Add some romantic flair with themed decorations. Use heart-shaped confetti or sprinkles around the serving area to create a festive atmosphere. Candles can also add a warm glow, perfect for a Valentine’s celebration.
– Packaging Ideas for Gifting: If you plan to gift these cookie bars, consider packaging them in clear bags tied with colorful bows. Alternatively, decorative boxes adorned with Valentine-themed designs make for a charming presentation. Include a handwritten note to add a personal touch.
Storage and Shelf Life
To maintain the freshness of your Sweet and Savory Peanut Butter Cookie Bars, follow these storage best practices. Allow the bars to cool completely before storing. Place them in an airtight container to prevent them from becoming stale. They can be stored at room temperature for up to a week. If you want to prolong their shelf life, consider freezing them.
To freeze, cut the bars into squares and place them in a single layer on a baking sheet. Freeze until solid, then transfer them to a freezer-safe container or bag. They can last up to three months in the freezer. When you are ready to enjoy them, simply thaw at room temperature or warm them slightly in the microwave for a freshly baked taste.
Conclusion
Making and sharing Sweet and Savory Valentine’s Peanut Butter Cookie Bars is a delightful way to celebrate love and friendship. The combination of sweet and savory flavors creates a memorable treat that is perfect for any occasion, especially Valentine’s Day. These cookie bars not only satisfy your cravings but also bring joy and warmth to those you share them with.
Baking is an act of love, and this recipe encapsulates that spirit beautifully. Whether you are treating a loved one, hosting a gathering, or simply indulging yourself, these cookie bars are sure to create lasting memories. Embrace the joy of baking this Valentine’s season, and let the flavors of love shine through in every bite.