Introduction
Chocolate desserts have an irresistible allure that captivates the hearts of many. From luxurious molten cakes to velvety mousses, the world of chocolate confections is vast and enticing. Among these delectable treats, the salted dark chocolate tart stands out, perfectly marrying rich, intense chocolate flavor with the delightful contrast of saltiness. This exquisite dessert not only satisfies the sweet tooth but also tantalizes the palate with its complex taste profile.
The salted dark chocolate tart is a sophisticated dessert that highlights the beauty of dark chocolate while balancing it with a touch of sea salt. The combination of smooth, rich filling encased in a buttery, flaky crust creates a layered experience that is both indulgent and refined. It is a dessert that invites celebration, whether it’s a special occasion or a simple evening treat, and it is sure to impress guests and family alike with its elegant presentation and delicious taste.
This article is designed to be your comprehensive guide to crafting this decadent salted dark chocolate tart. We will walk you through each step, from selecting the finest ingredients to assembling and baking the tart, ensuring that you achieve the perfect balance of flavors and textures. Let’s dive into the essentials of creating this chocolate masterpiece, starting with an understanding of the ingredients that will elevate your tart to divine levels.
Understanding the Ingredients
The Crust: A Foundation of Flavor
The foundation of any great tart lies in its crust, which not only provides structure but also contributes significantly to the overall flavor and texture of the dessert. For our salted dark chocolate tart, we use a classic tart crust, which requires a few key ingredients:
– High-Quality All-Purpose Flour: The backbone of the crust, all-purpose flour is essential for structure. Opt for a high-quality brand to ensure an even and tender texture. The right flour will help create a crust that is both flaky and sturdy enough to hold the luscious filling.
– Unsalted Butter: Butter plays a crucial role in achieving the desired flaky texture of the crust. Using unsalted butter allows you to control the saltiness of the final product, ensuring that the tart crust complements the rich filling. It is essential to use cold butter, as it helps create pockets of steam during baking, resulting in a beautifully flaky crust.
– Egg Yolk: Adding an egg yolk to the crust mixture enriches the dough, imparting a lovely flavor and a tender crumb. The fat in the yolk helps to create a silky texture, enhancing the overall mouthfeel of the crust.
– Ice Water: The addition of ice water is crucial in preventing the dough from becoming tough. It helps bind the ingredients while keeping the fat cold, which is essential for achieving flakiness. Be sure to add just enough water to bring the dough together—too much can lead to a dense crust.
The Filling: Richness Redefined
Once the crust is prepared, it’s time to focus on the filling, which is the star of the salted dark chocolate tart. The filling requires a careful selection of ingredients to ensure a rich, decadent flavor and smooth texture.
– Dark Chocolate (70% Cocoa Content): The choice of chocolate is vital in achieving the tart’s depth of flavor. Dark chocolate with at least 70% cocoa content provides a robust taste that balances beautifully with the added sweetness of the other ingredients. The higher cocoa content also means less sugar, allowing the natural bitterness of the chocolate to shine through.
– Heavy Cream and Whole Milk: Combining heavy cream and whole milk creates a silky, luxurious filling. The heavy cream adds richness, while the whole milk contributes a lighter texture. This combination is essential for achieving that melt-in-your-mouth quality that every chocolate lover craves.
– Eggs: Eggs are essential in this recipe, acting as a binding agent that helps to set the filling as it bakes. They contribute to the overall richness and provide a creamy consistency that complements the dark chocolate. Using large eggs is recommended for the best results.
– Vanilla Extract: A splash of vanilla extract elevates the flavor profile of the tart. It adds warmth and complexity, enhancing the deep notes of the dark chocolate without overpowering it. Always opt for pure vanilla extract for the best flavor.
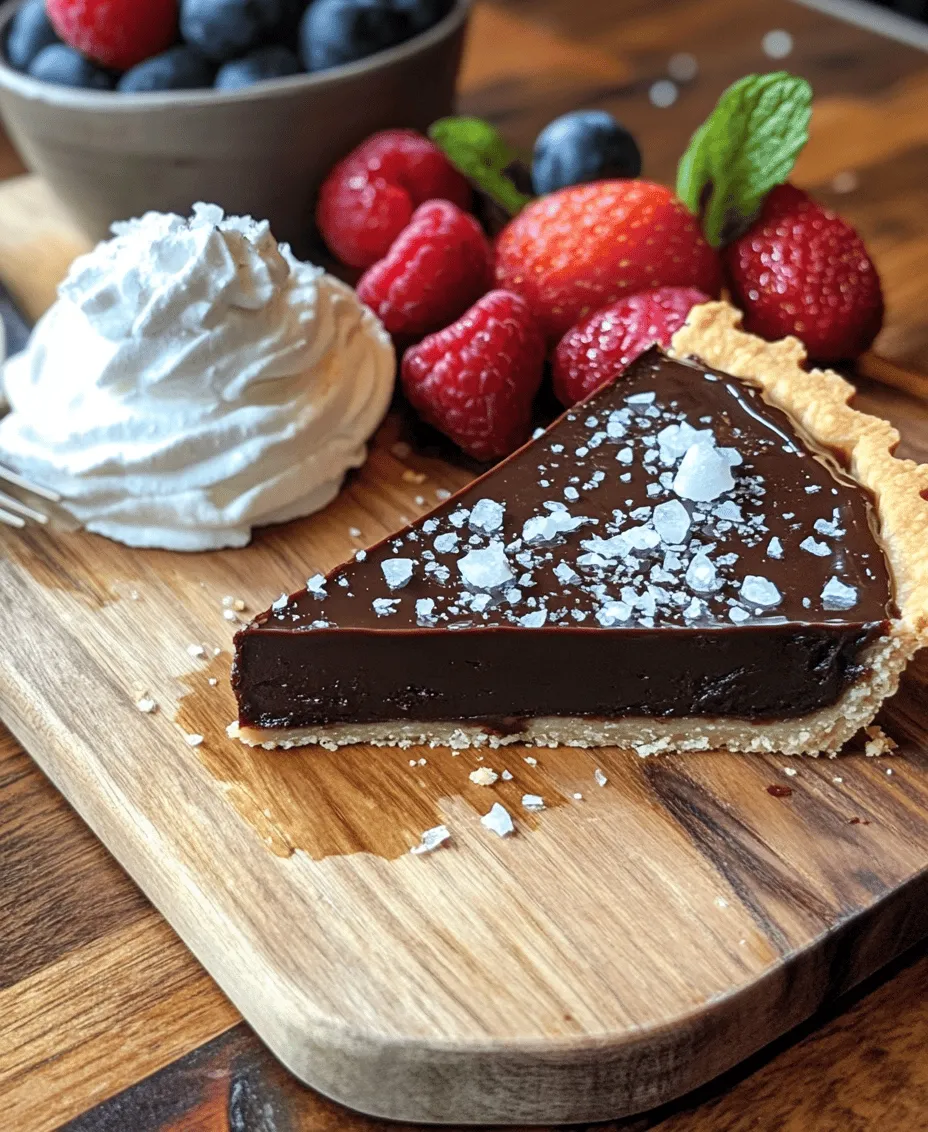
– Flaky Sea Salt: Finishing the tart with a sprinkle of flaky sea salt is what makes this dessert truly special. The salt contrasts beautifully with the sweetness of the chocolate, amplifying its flavor and providing a delightful crunch. It’s the final touch that transforms a simple chocolate tart into an extraordinary treat.
Preparation Steps
Crafting the Perfect Tart Crust
Creating the perfect tart crust is a vital first step in your salted dark chocolate tart journey. Follow these detailed instructions to ensure a successful crust that serves as a delicious base for your filling.
1. Mixing the Dry Ingredients: Begin by sifting together the all-purpose flour and a pinch of salt in a large mixing bowl. This step ensures that the ingredients are evenly distributed and prevents clumping.
2. Incorporating the Butter: Next, cut the cold unsalted butter into small cubes and add them to the flour mixture. Using a pastry cutter, fork, or your fingertips, work the butter into the flour until the mixture resembles coarse crumbs. Be careful not to overwork the dough; you want to see small pieces of butter for that flaky texture.
3. Adding the Egg Yolk: In a small bowl, whisk together the egg yolk with a tablespoon of ice water. Pour this mixture into the flour and butter mixture. Using a fork, gently mix the ingredients until they start to come together. If the dough seems too dry, add more ice water, one teaspoon at a time, until it forms a cohesive mass.
4. Chilling the Dough: Once the dough is formed, shape it into a disc, wrap it in plastic wrap, and refrigerate for at least 30 minutes. Chilling the dough allows the gluten to relax, which helps prevent shrinkage during baking.
5. Rolling Out the Dough: After the dough has chilled, lightly flour a clean surface and roll it out to about 1/8-inch thickness. Carefully transfer the rolled dough into a tart pan, pressing it into the corners and trimming any excess. Prick the bottom of the crust with a fork to prevent it from puffing up during baking.
6. Pre-baking the Crust: To achieve a perfectly baked crust, preheat your oven to 375°F (190°C). Line the tart crust with parchment paper and fill it with pie weights or dried beans. Bake for about 15 minutes, then remove the parchment and weights and bake for an additional 5-10 minutes until the crust is lightly golden. Allow the crust to cool completely before adding the filling.
With the tart crust ready, we can now focus on the rich filling that will define this decadent dessert. Stay tuned for the next section, where we will dive into the preparation of the luscious dark chocolate filling that will make your salted dark chocolate tart a standout treat.
Importance of Chilling the Dough and Its Effects on Texture
Chilling the dough is a crucial step in creating the perfect tart crust. When the dough is chilled, the fats within it solidify, which helps maintain the structure when baked. This process prevents the crust from shrinking and ensures it holds its shape throughout baking. Additionally, chilling allows the gluten in the flour to relax, resulting in a tender, flaky texture. Ideally, you should chill the dough for at least 30 minutes before rolling it out; this makes it easier to handle and less likely to become tough.
Baking the Crust to Perfection
Step-by-Step Guidance on Rolling Out Dough and Fitting It into the Tart Pan
Once your dough has chilled, it’s time to roll it out. Begin by lightly flouring your countertop and placing the dough in the center. Using a rolling pin, roll the dough out into a circle about 1/8 inch thick, ensuring it is even. If the dough sticks, add a little more flour as needed.
When your dough reaches the desired thickness, carefully transfer it to the tart pan. You can do this by rolling the dough around the rolling pin and then unrolling it over the pan. Gently press the dough into the bottom and sides of the pan, being careful not to stretch it. Trim any excess dough that hangs over the edges, and if needed, patch any tears with leftover scraps.
Explanation of the Blind-Baking Process and Its Importance in Preventing Sogginess
Blind-baking is essential for preventing a soggy crust, especially when you’re making a tart with a rich filling like salted dark chocolate. To blind-bake, first, preheat your oven to 375°F (190°C). Line the crust with parchment paper and fill it with pie weights or dried beans to keep it from puffing up during baking. Bake for 15 minutes, then remove the weights and parchment and bake for an additional 10-15 minutes until the crust is lightly golden. This process ensures the crust is fully cooked and provides a firm base for your luscious filling.
Visual Cues for Determining Doneness and Achieving a Golden Finish
Keep an eye on your crust as it bakes. You’re looking for a lightly browned color that signals it’s ready. The edges should be golden, while the bottom should appear dry. If it starts to darken too quickly, you can cover the edges with foil to prevent burning while allowing the center to continue baking. Once done, allow the crust to cool completely before adding the filling.
Creating the Luxurious Chocolate Filling
Step-by-Step Method for Heating Cream and Milk Without Boiling
The filling for your salted dark chocolate tart is what truly elevates this dessert. Start by combining equal parts heavy cream and whole milk in a small saucepan over medium heat. Stir gently and watch closely; you want the mixture to heat until steam rises, but do not let it boil. This careful heating ensures that the cream mixes smoothly with the chocolate without curdling.
Techniques for Melting Chocolate Perfectly to Avoid Graininess
While the cream and milk are heating, chop your dark chocolate into small pieces and place it in a large mixing bowl. Once the cream mixture is hot, pour it over the chopped chocolate. Allow it to sit for about 2-3 minutes; this gives the chocolate time to melt without the need for additional heat. After resting, whisk the mixture until smooth. If you notice any graininess, you may need to gently reheat it over a double boiler, stirring continuously until silky.
Instructions for Whisking Eggs and Sugar to Achieve the Right Texture
In a separate bowl, whisk together the eggs and sugar until light and frothy. This aeration helps create a rich texture in the filling. Once combined, it’s important to temper the eggs by gradually adding a small amount of the warm chocolate mixture to the egg mixture while whisking continuously. This step prevents the eggs from scrambling. Once tempered, you can gradually add the egg mixture back into the chocolate, whisking until everything is well combined.
Importance of Combining Mixtures Gradually for a Smooth Filling
Combining the mixtures gradually is key to achieving a smooth, decadent filling without lumps. Mixing too quickly or adding too much at once can lead to a grainy texture, ruining the silky mouthfeel of your tart. Take your time during this step to ensure a luscious result.
Assembling and Baking the Tart
Pouring the Filling into the Crust: Tips for Even Distribution
With your crust cooled and the filling prepared, it’s time to assemble the tart. Pour the chocolate filling into the cooled crust, ensuring it is evenly distributed. You can gently tap the tart pan on the counter to help eliminate any air bubbles and further ensure an even surface.
Baking Techniques to Ensure a Perfectly Set Filling with a Slight Jiggle
Bake the tart in a preheated oven at 350°F (175°C) for about 25-30 minutes. The filling should be set around the edges but still have a slight jiggle in the center. This jiggly texture is a sign that the chocolate filling will firm up perfectly as it cools, creating a rich and velvety consistency.
Cooling Instructions to Achieve Ideal Serving Temperature
Once baked, remove the tart from the oven and allow it to cool at room temperature for about 30 minutes. Afterward, transfer it to the refrigerator to chill for at least two hours. Chilling not only helps the filling set properly but also enhances the flavors, making for a more enjoyable eating experience.
Garnishing and Serving Suggestions
Importance of Garnishing with Flaky Sea Salt: Enhancing Visual Appeal and Flavor
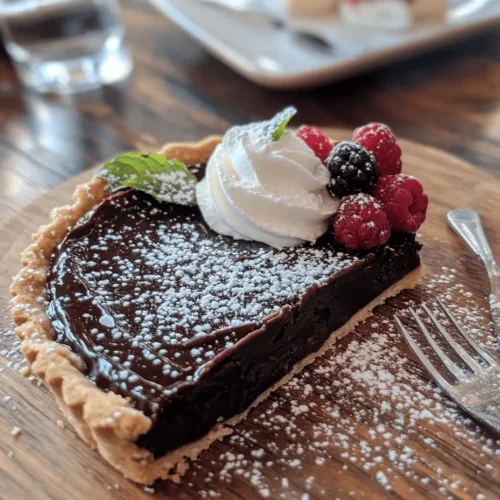
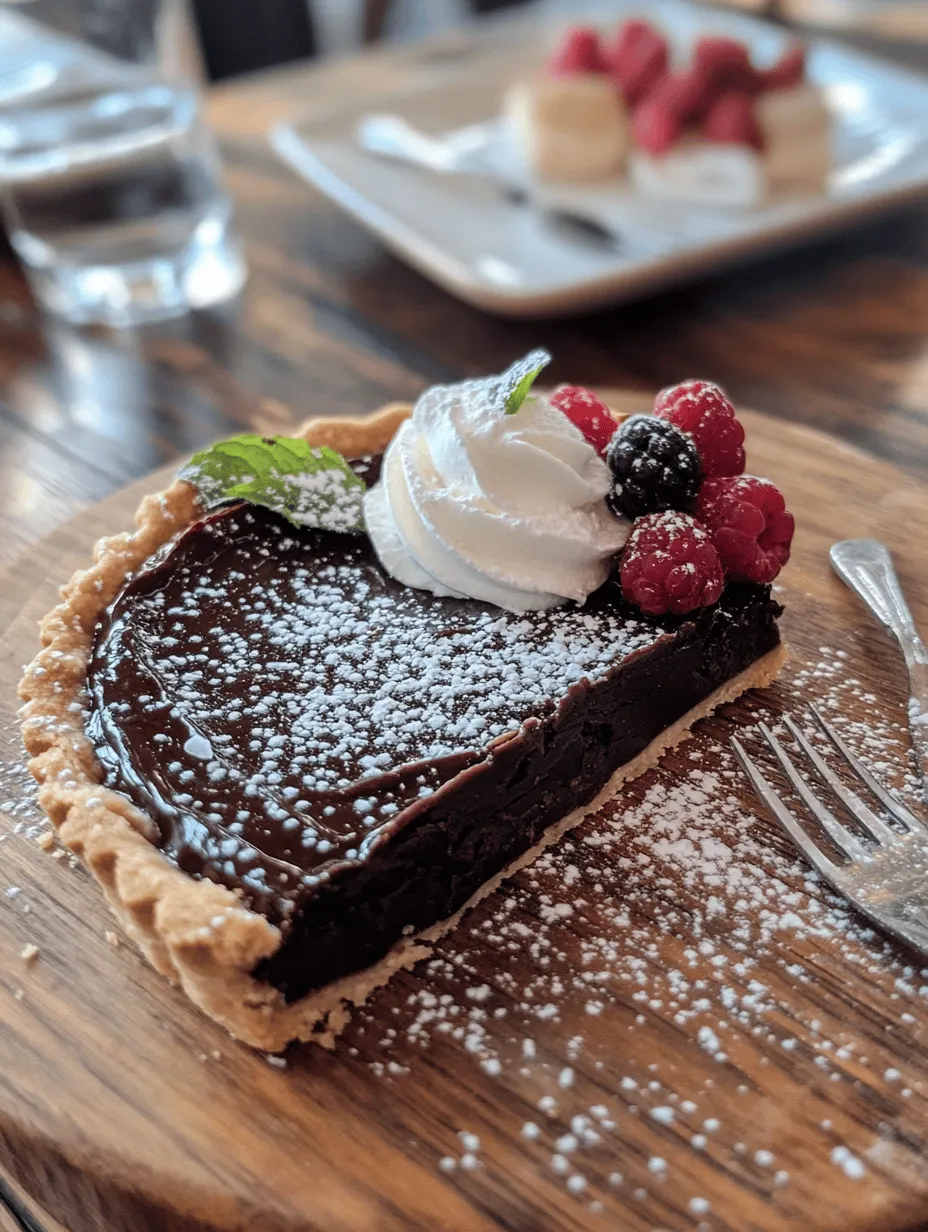
To elevate your salted dark chocolate tart, finish it with a sprinkling of flaky sea salt. This garnish not only adds a beautiful contrast to the dark chocolate but also enhances the flavor by balancing the sweetness with a touch of salt. The visual appeal of the glistening salt on top makes the tart even more enticing.
Suggestions for Serving: Pairing with Fresh Berries or Whipped Cream
When it comes to serving, consider pairing your tart with some fresh berries, such as raspberries or strawberries. Their tartness complements the rich chocolate beautifully. A dollop of freshly whipped cream can also add a light, creamy contrast, making each bite a delightful experience. For an extra special touch, serve with a drizzle of chocolate sauce or a dusting of cocoa powder for added decadence.
Tips for Slicing and Presenting the Tart Beautifully
To slice your tart, use a sharp knife dipped in hot water; this will help create clean cuts without disturbing the filling. Wipe the knife clean between slices for the best presentation. Arrange the slices on dessert plates with a few berries and a sprig of mint for an elegant touch.
Conclusion
The salted dark chocolate tart is a masterpiece that combines rich flavors and textures, making it a standout dessert for any occasion. With its buttery, flaky crust and luxurious chocolate filling, each bite is a celebration of indulgence. The process of creating this tart—from chilling the dough to achieving the perfect bake—offers a rewarding experience, and the satisfaction of serving a homemade treat is unmatched.
Whether you’re celebrating a special occasion or simply treating yourself to a delightful dessert, this tart is sure to impress. Enjoy it as the centerpiece of your gatherings, sharing the joy of good food with friends and family. The salted dark chocolate tart is not just a dessert; it’s an experience that embodies the love and care of homemade cooking.