Introduction
Cheesecake bars have become a beloved dessert for many, offering the indulgent flavors of traditional cheesecake in a more convenient and shareable form. Their appealing texture, rich flavor, and ease of preparation make them a staple at gatherings, parties, and family celebrations. Among the myriad of flavors and twists on this classic dessert, Reese’s Butterfinger Cheesecake Bars stand out as a truly unique offering. Combining the creamy, velvety texture of cheesecake with the crunchy goodness of Butterfinger candy bars, and drizzled with rich chocolate, these bars promise a delightful treat for dessert lovers.
This recipe brings together the best of both worlds: the smooth creaminess of cheesecake and the satisfying crunch of candy bars. The result is a dessert that’s not only visually appealing but also tantalizingly delicious, with layers of flavors that will keep you coming back for more. With every bite, you’ll experience the perfect balance of sweetness, creaminess, and crunch—making these Reese’s Butterfinger Cheesecake Bars a must-try for any sweet tooth.
The Allure of Cheesecake Bars
Cheesecake bars are a delightful variation of the traditional cheesecake, offering the same rich flavor in a more portable format. Unlike their round counterparts, cheesecake bars are cut into squares or rectangles, making them easy to serve and share. This characteristic has contributed to their rising popularity, especially at social gatherings, where guests appreciate the ease of enjoying a slice without the need for forks or plates.
One of the key advantages of cheesecake bars is their versatility. While the classic cheesecake flavor is undeniably delicious, the possibilities for flavor combinations are virtually endless. From fruity variations like strawberry or raspberry to decadent options featuring chocolate or caramel, cheesecake bars can be tailored to suit any palate. The Reese’s Butterfinger Cheesecake Bars take this versatility to the next level by incorporating two iconic candies, making them a crowd-pleaser that appeals to chocolate and peanut butter lovers alike.
These bars are perfect for any occasion—be it a birthday party, holiday gathering, or simply a sweet treat to enjoy after dinner. Their rich taste and appealing presentation make them a hit among both kids and adults, ensuring that they will be the star of the dessert table.
Ingredients Breakdown
To create the delectable Reese’s Butterfinger Cheesecake Bars, it’s essential to gather the right ingredients that will contribute to their unique flavor and texture. This recipe features a delightful combination of a buttery crust, a creamy cheesecake filling, and a luscious chocolate ganache topping, all enhanced by the iconic flavors of Reese’s and Butterfinger.
Crust Ingredients
1. Graham Cracker Crumbs: The foundation of the crust, graham cracker crumbs provide a sweet and slightly crunchy base that pairs perfectly with the creamy filling. They absorb moisture well, ensuring the crust holds together without becoming soggy.
2. Cocoa Powder: By adding cocoa powder to the crust, we enhance the chocolate flavor profile, making it rich and indulgent. This ingredient not only contributes to the taste but also adds a deeper color to the crust, elevating its visual appeal.
3. Sugar and Butter: Sugar adds sweetness to the crust, balancing the flavors of the cheesecake filling. Meanwhile, melted butter acts as a binding agent, creating a cohesive mixture that can be pressed into the baking dish to form a solid base. The combination of sugar and butter ensures a delectable melt-in-your-mouth experience.
Cheesecake Filling Ingredients
1. Cream Cheese: The star of the cheesecake filling, cream cheese provides the rich, creamy texture that defines any cheesecake. Using softened cream cheese ensures a smooth blend without lumps, resulting in an ultra-creamy filling.
2. Peanut Butter: For those who adore the combination of chocolate and peanut butter, adding peanut butter to the filling is a game-changer. It introduces a nutty flavor and enhances the creaminess, making each bite even more enjoyable.
3. Eggs: Eggs are critical for the structure of the cheesecake. They help bind the ingredients together and provide stability to the filling as it bakes, ensuring the bars maintain their shape.
4. Vanilla Extract: A splash of vanilla extract adds depth to the flavor profile of the cheesecake filling, enhancing the overall taste without overpowering the other ingredients.
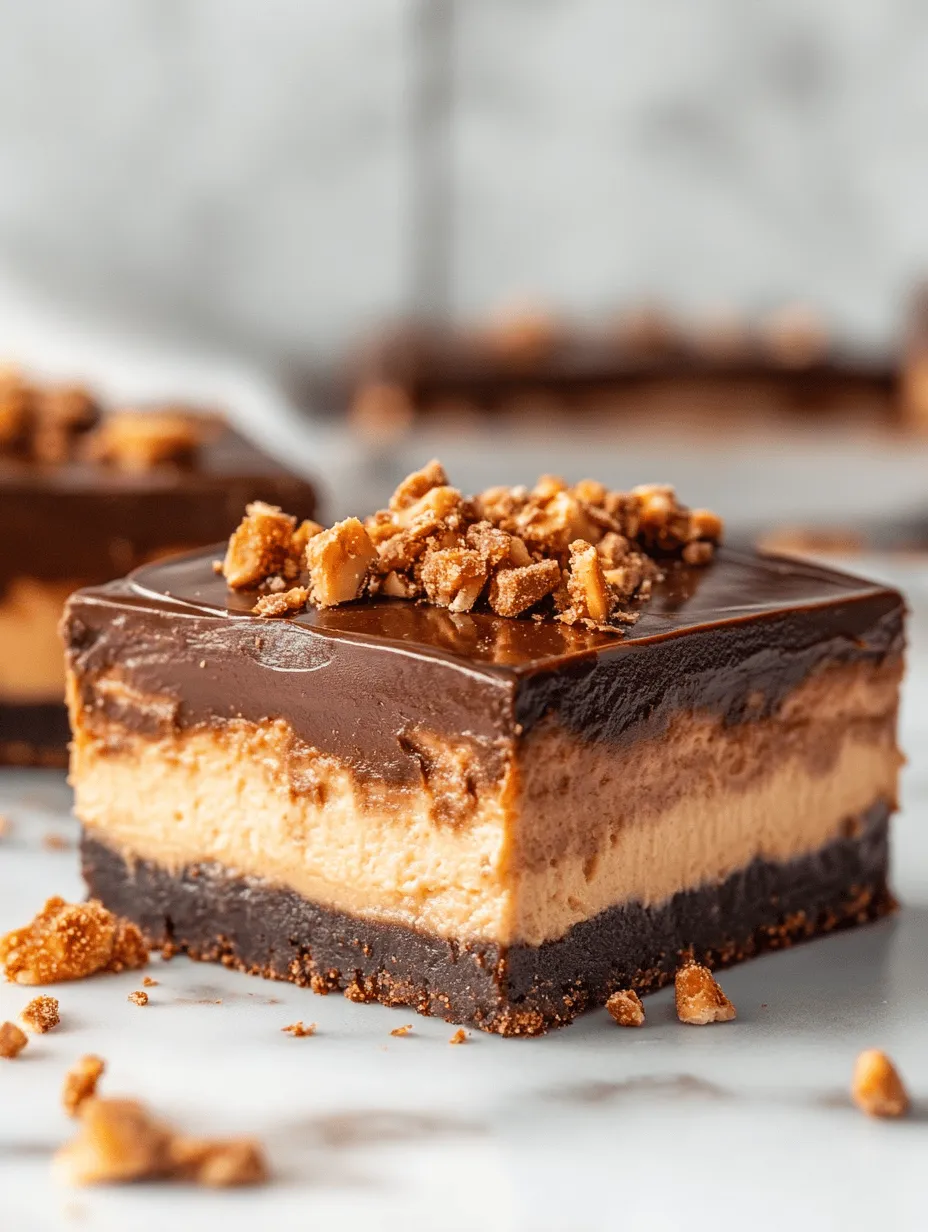
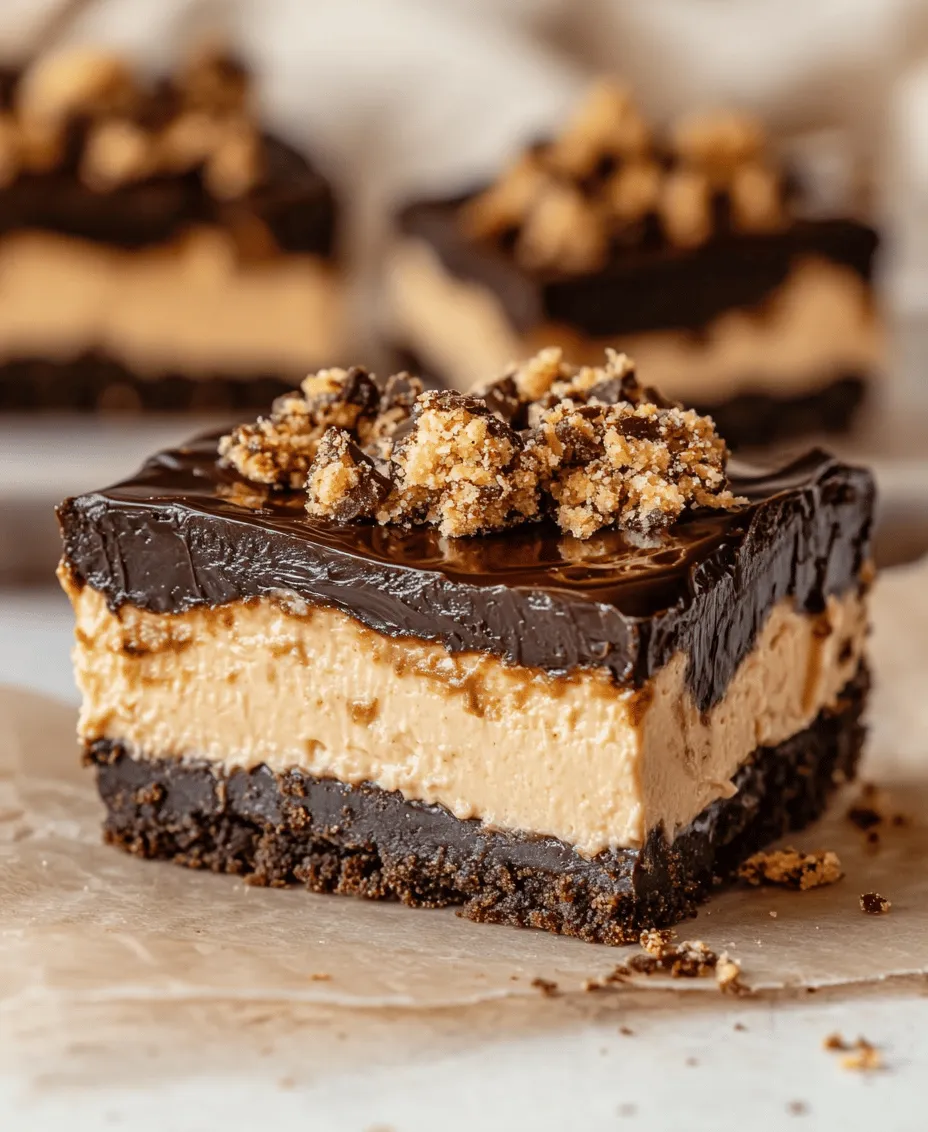
5. Butterfinger Bars: The pièce de résistance of this recipe, crushed Butterfinger bars, infuse the cheesecake filling with crunchy bits and a sweet caramel taste, enriching the overall flavor experience.
Topping Ingredients
1. Chocolate Chips: Used for the ganache topping, chocolate chips melt beautifully and create a rich, glossy finish. The chocolate adds a decadent layer that complements the sweetness of the cheesecake.
2. Butter: A small amount of butter mixed with the chocolate chips helps create a luxurious ganache that drizzles beautifully over the cheesecake bars, adding both shine and flavor.
3. Crushed Butterfinger: The finishing touch, crushed Butterfinger bars sprinkled on top of the ganache, not only enhances the visual appeal but also provides an extra crunch and burst of flavor that ties everything together.
Step-by-Step Instructions
Preparing the Crust
To start your journey to creating Reese’s Butterfinger Cheesecake Bars, you’ll first need to prepare the crust. This step is crucial, as it lays the foundation for your delicious bars.
1. Preheat the Oven: Begin by preheating your oven to 325°F (163°C). This temperature is ideal for baking the crust, ensuring it becomes golden and firm.
2. Mix the Ingredients: In a large mixing bowl, combine the graham cracker crumbs, cocoa powder, sugar, and melted butter. Use a fork to mix everything thoroughly until the mixture resembles wet sand. The butter should be evenly distributed throughout the dry ingredients, ensuring that the crust holds together when pressed.
3. Press the Crust Firmly: Line a 9×9 inch baking dish with parchment paper for easy removal later. Pour the crumb mixture into the prepared dish and use the back of a measuring cup or your fingers to firmly press the mixture into an even layer across the bottom of the dish. This step is crucial, as a well-pressed crust will provide the necessary structure to support the creamy cheesecake filling.
4. Bake the Crust: Place the crust in the preheated oven and bake for about 10 minutes, or until it is slightly firm to the touch and has taken on a light golden color. Once baked, remove the crust from the oven and allow it to cool while you prepare the cheesecake filling.
Making the Cheesecake Filling
Once your crust has cooled, it’s time to turn your attention to the cheesecake filling. This step is where the magic happens, as you’ll create a creamy and luscious filling that will make your dessert unforgettable.
1. Prepare the Cream Cheese: Ensure that your cream cheese is at room temperature before starting. This is essential for achieving a smooth filling. If your cream cheese is too cold, it may result in lumps and an uneven texture. To speed up the process, you can microwave the cream cheese for about 10-15 seconds if needed.
2. Mix the Cream Cheese and Peanut Butter: In a large mixing bowl, with an electric mixer, beat the softened cream cheese and peanut butter together until fully blended and creamy. This process should take about 2-3 minutes. Make sure to scrape down the sides of the bowl to ensure everything is well combined.
3. Add the Eggs and Vanilla: Once the cream cheese and peanut butter mixture is smooth, add the eggs one at a time, mixing well after each addition. Then, add the vanilla extract and continue to mix until everything is well incorporated.
4. Fold in the Butterfinger: Finally, gently fold in the crushed Butterfinger bars into the cheesecake filling. This step adds texture and flavor, ensuring that each bite is packed with crunch.
5. Pour the Filling onto the Crust: Carefully pour the cheesecake filling over the cooled crust, spreading it evenly with a spatula to create a smooth surface.
With these detailed instructions, you’re well on your way to creating a delicious batch of Reese’s Butterfinger Cheesecake Bars. In the next part of this article, we will dive into the baking process and the final touches that will make these bars truly irresistible. Stay tuned for tips on achieving the perfect bake and making the luscious chocolate ganache topping!
Importance of Folding in the Butterfinger Bars Gently to Maintain Texture
When incorporating the crushed Butterfinger bars into your cheesecake mixture, it’s essential to fold them in gently. This technique helps to preserve their crunchy texture, ensuring that every bite retains that satisfying crunch. If you were to mix them too vigorously, you risk breaking down the pieces further, turning them into smaller bits that might lose their distinctiveness in the creamy cheesecake filling.
Folding involves using a spatula or a large spoon to lift and turn the mixture, carefully combining the ingredients without deflating the air you’ve incorporated into the batter. This method maintains a light and airy texture, crucial for achieving the perfect cheesecake consistency.
Instructions for Baking the Cheesecake
1. Preheat the Oven: Start by preheating your oven to 325°F (160°C). This temperature is ideal for baking cheesecakes, providing a gentle heat that allows the filling to set without cracking.
2. Prepare the Pan: Line a 9×13 inch baking dish with parchment paper, allowing some overhang for easy removal later. This step ensures that your cheesecake bars come out intact and makes for easy cutting.
3. Combine the Ingredients: In a medium bowl, beat together the cream cheese and sugar until smooth and creamy. Next, add the eggs one at a time, mixing well after each addition. Incorporate the vanilla extract, and then gently fold in the crushed Butterfinger bars with a spatula.
4. Pour and Spread: Pour the cheesecake mixture into the prepared baking dish, spreading it evenly to create a smooth surface.
5. Bake: Place the dish into the preheated oven and bake for 30-35 minutes. The cheesecake should be set around the edges but slightly jiggly in the center.
Tips on Checking for Doneness
To ensure your cheesecake is perfectly baked, keep an eye on it in the last few minutes of baking. A good indicator of doneness is the slight jiggle in the center. If the edges are firm and the center still has a slight wobble, it’s likely ready to come out of the oven. Additionally, you can insert a toothpick into the center; it should come out clean or with just a few moist crumbs attached, indicating that the cheesecake has set properly.
Importance of Cooling and Chilling for the Perfect Texture
After baking, it’s crucial to allow the cheesecake bars to cool gradually. Start by letting them cool at room temperature for about an hour. This step helps prevent cracks from forming as the temperature changes. Once cooled, cover the baking dish and refrigerate for at least 4 hours, or preferably overnight. Chilling allows the flavors to meld beautifully and gives the cheesecake its signature creamy texture, making it easier to cut into bars.
How to Prepare the Chocolate Topping
The chocolate ganache topping adds a rich layer to your cheesecake bars, enhancing both their flavor and visual appeal.
1. Melt the Chocolate and Butter: In a microwave-safe bowl, combine 1 cup of semi-sweet chocolate chips with 2 tablespoons of unsalted butter. Heat in the microwave in 30-second intervals, stirring between each interval until melted and smooth.
2. Achieve the Right Consistency for the Ganache: To ensure your ganache has the right consistency, it should be glossy and pourable. If the ganache is too thick, add a teaspoon of cream or milk and stir until smooth. If it’s too thin, you can return it to the microwave for a few seconds to thicken it up.
Final Steps for Garnishing and Serving
After chilling the cheesecake bars, pour the chocolate ganache over the top, spreading it evenly to cover the entire surface. Before serving, it’s important to let the bars set at room temperature for about 30 minutes. This allows the ganache to firm up slightly, making it easier to cut clean slices.
Using a sharp knife, cut the cheesecake into squares or rectangles, wiping the knife with a damp cloth between cuts for cleaner edges. Consider garnishing with additional crushed Butterfinger bars or a drizzle of melted chocolate for an extra touch.
Flavor Profile Analysis
The Reese’s Butterfinger Cheesecake Bars present a delightful balance of contrasting flavors and textures. The creamy cheesecake filling is sweet yet slightly tangy, providing a perfect base for the rich chocolate ganache. The addition of Butterfinger bars introduces a layer of complexity, with their crunchy texture and caramel-like sweetness creating an exciting contrast against the smoothness of the cheesecake.
The bittersweet notes of cocoa in the chocolate ganache serve to balance the overall sweetness. This interplay between sweet and slightly bitter creates a multi-dimensional flavor experience that keeps each bite interesting. The richness of the chocolate ganache enhances the overall indulgence, making these bars a true treat for the senses.
Nutritional Information
When it comes to indulging in these cheesecake bars, understanding their nutritional profile is essential, especially if you’re mindful of your dietary intake.
– Serving Size: Each bar is approximately 2×2 inches, and a typical recipe yields about 12 bars.
– Calories: Each bar contains roughly 250-300 calories, depending on the specific brands of ingredients used.
– Key Nutrients: These bars provide protein from the cream cheese and eggs, while the Butterfinger bars contribute some carbohydrates and sugars. The chocolate ganache adds fats, primarily from the chocolate and butter used.
For those with dietary restrictions, consider making adjustments. For a gluten-free option, ensure that the Butterfinger bars and any other ingredients are certified gluten-free. You could also experiment with alternative sweeteners or reduced-fat cream cheese to suit different dietary needs.
Storage and Serving Suggestions
To keep your Reese’s Butterfinger Cheesecake Bars fresh, store them in an airtight container in the refrigerator. They can last up to 5 days, though the flavor may deepen as they sit. If you want to keep them longer, consider freezing the bars. Wrap them tightly in plastic wrap and then place them in a freezer-safe container. They can be frozen for up to three months.
When serving, these bars pair wonderfully with a hot cup of coffee or a glass of milk, making them perfect for dessert after a family dinner or a sweet treat during a coffee break. For variations, try swapping in other candy bars like Snickers or Milky Way for a different flavor profile, or top them with crushed nuts for an added crunch.
Conclusion
Reese’s Butterfinger Cheesecake Bars are more than just a dessert; they are a delightful indulgence that combines creamy, crunchy, and rich flavors into each bite. With their beautiful presentation and harmonious flavors, they are perfect for sharing with friends and family during gatherings or special occasions.
Baking these bars not only brings joy to your taste buds but also creates memorable moments in the kitchen. The process of mixing, baking, and decorating becomes an experience to cherish, especially when shared with loved ones. I encourage you to try this recipe for a delightful dessert experience that is sure to impress and satisfy any sweet craving. Enjoy the process and the delightful results of your baking efforts!